
Match the Fix to the Stain—Without Sacrificing the Finish
Blot and dry fresh spills, but diagnose old marks first. Use the least aggressive compatible cleaner and stop if the finish or wood begins to change.
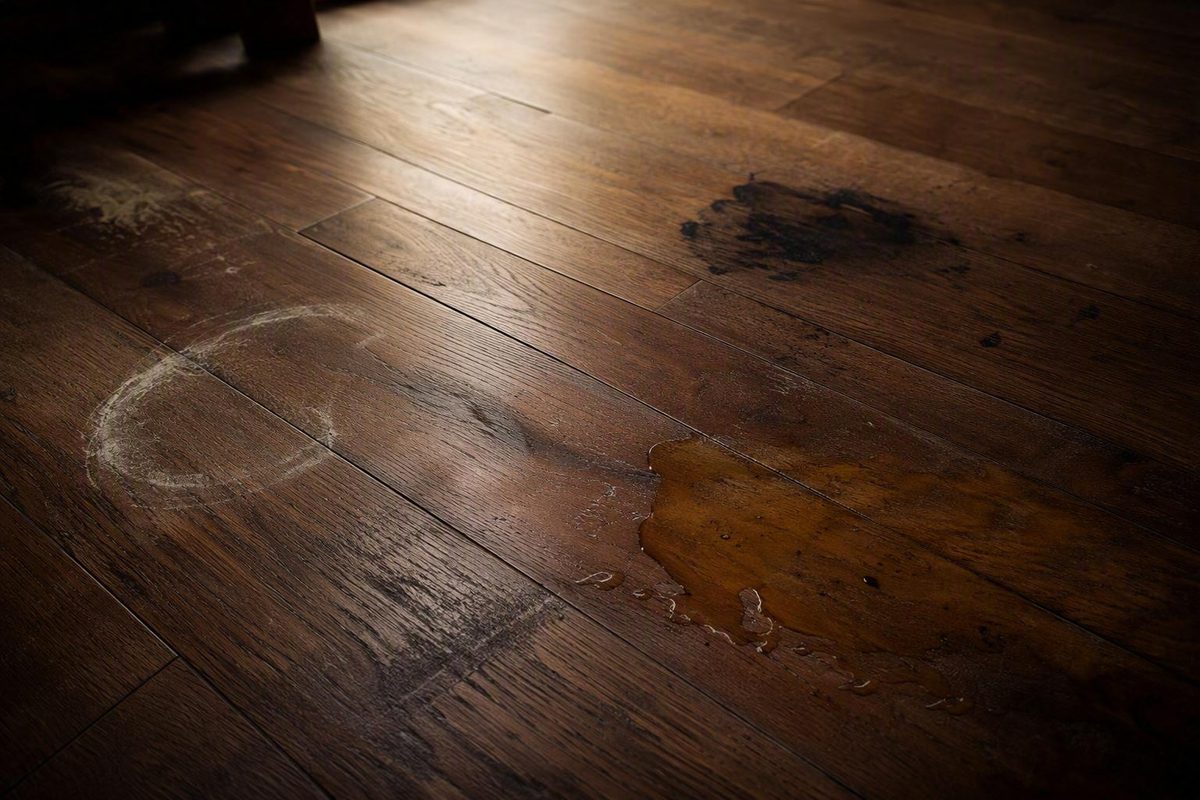
Learning how to get stains out of hardwood floors starts with resisting the urge to scrub. A cloudy water mark, greasy film, old black pet stain, and dirty patch of exposed wood are not versions of the same problem. One may sit on the protective finish; another may have changed the wood itself.
The safest approach is to identify the likely source, estimate how deeply the damage extends, confirm the floor and finish type, and escalate from the least aggressive compatible treatment. Cleaning can remove surface residue. It cannot necessarily reverse discoloration inside the wood, restore a failed finish, or eliminate contamination beneath the boards.
Start Here: The Five-Minute Stain Triage
For a fresh spill:
- Stop the source. Move the leaking planter, remove the damp rug, address the appliance or plumbing leak, or keep a pet away from the area.
- Blot—do not rub. Press a soft, absorbent white cloth or microfiber towel onto the liquid. Replace it as it becomes wet.
- Remove loose grit. Lift particles carefully so they do not scratch the finish during cleanup.
- Use minimal moisture. Do not flood the spot or spread diluted residue into board seams.
- Dry promptly. Use clean towels and do not leave the floor wet.
Rubbing can spread a fresh spill and drive residue into seams, scratches, worn finish, or exposed grain. Standing liquid can also reach joints and contribute to staining, swelling, discoloration, or warping, which is why hardwood-care guidance favors blotting and prompt drying. ORAPI Asia describes these moisture and abrasion risks.
For an old, dry, or unidentified mark, inspect before adding cleaner. Record:
- Its color: white, gray, brown, black, greasy, waxy, or sharply pigmented
- Its pattern: a ring, distinct edge, scattered droplets, traffic path, or discoloration following a seam
- Its texture: smooth, tacky, cloudy, flaky, rough, raised, or soft
- Any odor
- When it first appeared
- Whether the area has been exposed to a leak, planter, pet accident, damp rug, tracked ice melt, or repeated wet cleaning
- Whether the mark changes in visibility under daylight or low-angle light
Check installation records, leftover cartons, finish containers, maintenance documents, and the flooring or finish manufacturer’s current care instructions. Do this before using solvents, peroxide, bleach, abrasives, wax, oil, polish, or heat. A treatment accepted for one intact polyurethane finish may be unsuitable for a waxed, oiled, unfinished, worn, or proprietary factory-coated floor.
If you cannot identify the finish confidently, do not conduct a series of chemical tests in the middle of the room. Ask the flooring or finish manufacturer, or have a flooring professional inspect the surface.
The working rule is simple: begin with the least aggressive treatment capable of addressing the actual problem. For ordinary surface residue, that generally means a cleaner specifically labeled for hardwood and compatible with the existing finish—preferably a pH-neutral product—rather than an acidic, abrasive, oily, or bleaching household remedy. Lightly damp tools are preferable to saturation, and vinegar and steam should not be treated as universal hardwood-cleaning methods. SVB Wood Floors summarizes the case for pH-neutral products and minimal moisture.
Stop a treatment immediately if you see:
- Clouding, whitening, or loss of sheen
- Color transferring from the floor to the cloth
- Tackiness, wrinkling, or softening of the finish
- Raised grain or roughening wood
- Swelling, cupping, or changing board edges
- A moisture mark that continues to grow
- Flaking that spreads beyond the original spot
Let the area dry completely between attempts. Judging the result too soon can cause you to repeat an ineffective treatment or mistake temporary wetting for improvement.
Identify the Stain, Its Depth, and the Floor Beneath It
A useful diagnosis has four levels:
- Surface residue: Material is sitting on an intact protective finish.
- Finish damage or discoloration: The topcoat has clouded, softened, worn away, flaked, or changed sheen or color.
- Wood-fiber discoloration: Liquid or chemistry has reached and altered the wood beneath the finish.
- Below-board contamination or moisture: Liquid, odor, or damage extends into seams, board undersides, adhesive, underlayment, or subfloor.
The deeper the problem, the less likely ordinary cleaning is to solve it.
| Appearance | Likely cause | Useful clues | Safest first step | Principal risk | Escalation point |
|---|---|---|---|---|---|
| Sticky, smeared, or crusted material on a smooth surface | Food, drink, cleaner residue, or tracked material | Finish remains hard and intact | Dry removal, then compatible hardwood cleaner | Scratching or spreading residue | Mark remains after removable material is gone |
| White ring or cloudy haze | Moisture associated with the topcoat | Surface may still feel smooth | Remove the moisture source and let the floor dry fully | Heat, abrasion, or chemicals worsening the finish | Haze remains after complete drying |
| Brown, gray, or black water mark | Moisture may have entered the wood | Mark follows seams, a leak path, planter, or appliance | Correct the moisture source and assess depth | Repeated wetting or concealed damage | Roughness, cupping, softness, or persistent darkening |
| Greasy or oily spot | Cooking oil, cosmetics, lubricant, or polish | Slick feel, dirt attraction, spreading edge | Compatible pH-neutral cleaner | Solvent changing sheen or softening finish | Oil appears to be below the finish |
| Fresh pet urine | Recent accident | Wetness and characteristic odor | Blot, use a compatible labeled cleaner, and dry | Liquid entering seams | Odor or discoloration remains after drying |
| Old black pet-type mark | Possible penetrated urine or another wood reaction | Darkened wood, possible odor, damaged finish | Assess finish, texture, extent, and construction | Bleaching, haloing, or deeper contamination | Rough or soft wood, deep odor, or multiple affected boards |
| Raised candle wax | Dripped or pooled wax | Material sits above the finish | Harden and lift with plastic | Scratching with a metal blade | Dye, oil, or a sheen change remains |
| Gray or dirty traffic patch | Finish worn through, exposing wood | Dull or bare texture; dirt follows the grain | Stop wet cleaning and assess for repair | Driving dirt and moisture deeper | Exposed fibers require sanding and resealing |
White or cloudy water marks may be associated with moisture in or near the topcoat, while darker discoloration more often suggests penetration into the wood. That distinction is useful but not conclusive. Lighting, previous coatings, dyes, oxidation, residue, wood species, finish age, and wear can all complicate the appearance. Robbins’ hardwood-stain guide discusses the distinction and its limitations.
Texture offers another clue, but not proof. A smooth, hard, intact surface points toward residue or a finish-level issue. Cloudiness or flaking suggests coating damage. Rough fibers indicate exposed or affected wood. Soft or “punky” material is no longer an ordinary cleaning problem.
Visible color and odor are separate problems
A pet mark may become lighter while its odor remains. Conversely, an odor-focused cleaner may remove accessible residue without reversing black discoloration in the wood fibers. Odor can persist in gaps, joints, board undersides, adhesive, underlayment, or subfloor.
Do not assume black color proves pet urine, mold, or water damage. Odor alone also does not establish how far contamination has traveled. Moisture history, board condition, the affected pattern, and the materials beneath the floor all matter.
Floor construction changes the repair limit
Before sanding engineered flooring, identify the product and confirm its wear-layer thickness, prior sanding history, and manufacturer restrictions.
Finish type matters just as much:
-
Intact polyurethane: May tolerate compatible surface cleaning, but solvents and bleaching agents can alter the coating.
-
Factory-finished flooring: May have a proprietary coating that is difficult to blend or recoat locally.
If the floor or finish remains unknown, uncertainty is a reason to pause—not a reason to try several remedies and see what happens.
Patch-Test Every Treatment and Escalate by Risk
A casual dab beside the stain is not a useful patch test. Choose an inconspicuous location with the same flooring, finish, age, and exposure whenever possible, such as inside a closet or beneath movable furniture.
Use this controlled process:
- Photograph the dry test area.
- Remove loose dust and grit without scratching.
- Read the flooring guidance and the cleaner’s complete label.
- Apply the smallest practical amount with a clean white cloth or the labeled applicator.
- Monitor the surface while the product is present.
- Remove or rinse residue exactly as the label directs, using minimal liquid.
- Dry the area thoroughly.
- Wait until it has returned to a completely dry condition.
- Inspect it in daylight and normal room lighting, from above and at a low angle.
There is no universal safe contact time. Appropriate exposure depends on the product, finish chemistry, wood species, porosity, surface condition, stain depth, temperature, and amount applied. Timing from one product or online remedy cannot automatically be transferred to another floor.
After drying, look for:
- Lighter or darker color
- Lost gloss or a sheen mismatch
- Cloudiness or whitening
- Tackiness
- Softened or wrinkled finish
- Raised grain
- Swelling at seams
- A larger ring or halo
A successful patch test means the test area did not show an objectionable change under those limited conditions. It does not establish that a larger application, longer exposure, or repeated cycle will be safe.
Escalate in this order
- Dry removal or blotting
- Manufacturer-approved hardwood cleaner
- Stain-specific cleaner confirmed compatible with the finish
- Color-altering treatment authorized for the particular floor and finish
- Localized finish or wood repair
- Professional restoration, broader refinishing, or replacement
Use one labeled product at a time. Remove residue as directed and let the floor dry fully before deciding whether another step is justified. Combining or rapidly stacking products creates potentially incompatible residues and makes it harder to determine what is changing the floor.
Before treating the mark, define the result you need:
- Remove residue: Lift material sitting on the finish.
- Reduce odor: Remove or break down accessible odor-producing residue.
- Alter discoloration: Change the color of affected wood fibers.
- Restore the finish: Repair coating integrity, sheen, or exposed wood.
These are separate jobs. A cleaner may accomplish the first without doing anything for the other three.
Treat Surface Marks, Water Haze, Grease, Wax, and Worn-Finish Dirt
Fresh surface spills
Blot until the cloth no longer picks up liquid. Apply a hardwood-safe cleaner according to its label rather than spraying a large surrounding area. If the instructions permit residue removal with water, use a barely damp clean cloth and dry immediately.
If pigment remains after the removable material is gone, stop and reassess. Continued scrubbing may attack the finish rather than the stain.
White or cloudy water marks
Remove the moisture source first: a wet planter, damp rug, sweating container, leak, or repeated wetting. Blot any remaining liquid and allow the floor to dry fully before judging the mark.
If the finish remains hard and intact after drying, a gentle treatment specifically approved for that finish may be reasonable. Do not assume that every visible haze requires sanding. Equally, do not default to uncontrolled heat, mayonnaise, oil, toothpaste, or abrasive pastes. Oily materials can leave residue, while abrasive products can create a sheen mismatch.
Some general stain guides mention low heat, but heat should not be improvised on an unknown coating. Use it only when the flooring or finish manufacturer provides instructions for the particular product.
Dark water discoloration
Treat a dark water mark as possible wood-level penetration. Correct the leak or moisture source first, then inspect adjoining boards, seams, and accessible areas below the floor.
Do not repeatedly saturate the spot with cleaner. If the finish is intact but the color lies beneath it, surface washing cannot reach the discolored fibers without first altering or removing the coating. Cupped, swollen, soft, or progressively darkening boards require moisture assessment rather than stronger cleaning.
Grease and oil
Start with a pH-neutral wood-floor cleaner or mild grease-cutting product explicitly labeled for the floor and finish. When the label allows, apply it to a cloth rather than pouring it onto the boards.
Some stain guides suggest mineral spirits for stubborn oil, but it is not a universal next step. Use a solvent only when the flooring or finish manufacturer permits it and the solvent label provides instructions applicable to that surface. Patch-test first. If the finish dulls, softens, or transfers color, stop.
Oil that has penetrated worn finish may require localized repair rather than progressively stronger degreasers.
Candle wax
Let soft wax harden. A wrapped cold pack may help, provided condensation does not reach the floor. Once firm, lift the wax gently with a plastic scraper held nearly flat. Avoid metal blades, steel wool, and abrasive pads.
After lifting the wax, inspect for dye, oil, or a change in sheen. Treat any remaining shadow as a separate stain rather than continuing to scrape.
Dirt where the finish has worn away
A gray or brown traffic patch may not be a deposit sitting on the finish. Once the coating wears through, dirt can lodge directly in exposed fibers. Wet cleaning may darken the wood without removing the embedded material.
For a small, stable area, localized sanding and resealing may be the relevant repair. That means removing affected surface material, blending the transition, and rebuilding a compatible finish—not simply cleaning harder. Spot-repair guidance warns that sanding dirty exposed wood can leave a lighter area and that new stain or polyurethane may not match the aged floor. NOLA.com’s spot-repair overview explains these appearance limitations.
A repair can remain visible because surrounding boards have faded, ambered, or worn differently. Matching the color does not guarantee matching the sheen, and vice versa.
Handle Pet Urine as Two Problems: Residue or Odor and Wood Discoloration
Fresh urine and an old black mark require different approaches.
For a fresh accident
- Blot promptly with absorbent white cloths.
- Work from the outside toward the center without rubbing.
- Prevent liquid from spreading into seams.
- Use a cleaner specifically labeled as compatible with the hardwood and its finish.
- Remove residue as directed by the label.
- Dry the floor completely.
A hardwood-compatible enzyme cleaner may help with accessible urine residue or odor. Verify that its label permits use on the actual surface; “hard floor” does not necessarily include waxed, oiled, unfinished, or worn hardwood. Enzyme-cleaner guidance for wood emphasizes prompt blotting, small-area testing, residue removal, and thorough drying. TenantCloud’s pet-stain guide discusses these limits.
An enzyme product is not established as a reliable way to reverse old black discoloration in wood. It may improve odor or residue while leaving the wood color unchanged.
For an old dark or black mark
Before applying liquid, assess:
- Whether the finish is smooth, cloudy, missing, or flaking
- Whether the wood is hard, rough, raised, or soft
- Whether odor appears concentrated at the surface or along board joints
- Whether one spot or multiple boards are affected
- Whether the floor is solid or engineered
- Whether moisture is active or recurring
If the wood is rough or soft, odor appears to come from beneath the boards, or several boards are affected, repeated surface treatment is unlikely to solve the entire problem.
Where hydrogen peroxide fits
Three-percent hydrogen peroxide appears in some commercial and DIY guidance as a color-altering treatment for dark wood discoloration. It is not a routine floor cleaner. It may lighten a dark area, but it can also alter polyurethane, bleach adjacent wood, or replace the original mark with a conspicuous pale patch. Zerorez’s guidance acknowledges the discoloration risk associated with 3% peroxide.
The supplied guidance does not establish a universally safe amount, exposure period, or repetition limit across wood species and finishes. For that reason:
- Do not use peroxide on an unidentified floor or finish.
- Do not treat an intact coating unless the flooring and finish instructions permit it.
- Do not assume a successful short patch test makes repeated use safe.
- If preserving color and sheen is important, have a flooring professional evaluate the mark.
Peroxide lightening is not the same as a completed repair. Even if the dark color improves, the area may still require finish removal, color blending, and recoating.
One homeowner’s informal comparison illustrates why expectations should remain modest. Vinegar, a vinegar-and-baking-soda paste, and an enzyme cleaner did not meaningfully lighten the tested deep stain; peroxide produced limited lightening but also affected the polyurethane. The author expected sanding, bleaching, and refinishing to be necessary. This was one uncontrolled experiment, not evidence that every floor will respond the same way. The documented comparison provides useful expectation-setting, not a universal procedure.
When odor points below the surface
Persistent odor after the visible surface is clean may indicate residue in board gaps, undersides, adhesive, underlayment, or subfloor. If the odor remains after complete drying and appears concentrated along seams, boards may need to be removed so the underlying materials can be inspected.
Deeper repair may involve removing affected boards and determining whether the materials below can be treated within an appropriate restoration system or must be replaced. Flooring-retailer guidance similarly distinguishes surface or finish damage from rough fibers and odor that has reached underlying materials. Really Cheap Floors outlines these escalating repair categories.
Black color or odor alone cannot conclusively distinguish urine from long-term moisture, biological growth, a finish reaction, metal staining, or another wood-discoloration process. Ongoing dampness, visible growth, or soft material warrants professional evaluation rather than another household remedy.
Why Popular DIY Remedies Can Make the Floor Look Worse
Many online remedies can change a stain—but may change the surrounding finish or wood at the same time.
Vinegar
Recommendations conflict. Some stain guides suggest diluted vinegar for surface residue or pet accidents. Other hardwood-care sources warn that acidity may dull or damage certain finishes. Vinegar therefore should not be presented as universally safe.
In the informal comparison described earlier, vinegar and water removed surface grime but did little to the deep dark mark. Repeated vinegar-and-baking-soda applications also failed to remove it. That experience does not prove vinegar can never clean residue, but it does not support using it as a dependable treatment for penetrated black discoloration.
Baking soda, toothpaste, and powdered products
Baking soda, toothpaste, powdered cleaners, steel wool, scouring pads, and stiff brushes can abrade a finish. A material does not become nonabrasive simply because it is common in a kitchen or bathroom.
Abrasion may initially make a mark look lighter because the topcoat has been dulled or partially removed. Once dry, the result may be a matte halo, fine scratches, exposed grain, or an area that traps dirt more readily.
Household bleach
Do not treat household bleach as a general hardwood-stain remedy. Formulations, concentrations, compatible surfaces, dilution requirements, protective measures, ventilation instructions, rinsing directions, and restrictions vary.
For example, Clorox publishes product- and surface-specific protocols rather than endorsing undiluted bleach on every hardwood floor. Its guidance also restricts certain products to sealed or finished wood and requires users to follow the applicable label. The manufacturer’s pet-mess guidance illustrates why bleach use must remain product-specific.
Use only one product at a time. Do not improvise cleaner combinations, and follow the applicable label for handling, ventilation, protective equipment, residue removal, and disposal.
Steam and excess water
Steam is unsuitable as a universal hardwood stain treatment because it introduces heat and moisture. Those can affect the coating, enter seams, disturb wood fibers, or influence adhesive in some flooring systems.
The same caution applies to repeated wet compresses and long, improvised dwell periods. More liquid is not necessarily more effective. It may enlarge the mark, cloud the finish, raise the grain, swell board edges, contribute to cupping, or carry residue below the visible surface.
A treatment has failed as a floor repair if it lightens the mark but also:
- Strips or softens the topcoat
- Changes the sheen
- Bleaches unaffected wood
- Raises the grain
- Creates a larger halo
- Drives moisture into seams
- Leaves oily or waxy residue
- Interferes with a future coating
When Cleaning Ends: Sanding, Refinishing, Recoating, or Replacing Boards
Once removable residue is gone and the remaining color is in the finish or wood, stronger cleaning is often the wrong category of work. The next step may be repair.
Understand the options
Cleaning residue removes material from an intact surface without intentionally changing the finish.
Spot sanding removes finish and possibly a limited amount of wood in a localized area. The spot then needs compatible color and finish restoration.
Bleaching raw wood chemically alters discoloration after the coating has been removed. It can produce a lighter patch and usually requires additional color blending and refinishing.
Refinishing sands a larger area to raw wood and rebuilds the stain and protective coating. It offers a better opportunity for visual consistency but removes wood and expands the project.
Screening and recoating lightly abrades an existing finish so a new coat can bond. It does not sand to bare wood.
Board replacement removes boards whose fibers are too deeply stained, deteriorated, or contaminated to restore acceptably.
What screening can—and cannot—do
A screen-and-recoat can renew a compatible, adequately bonded polyurethane finish with shallow surface wear. It does not remove discoloration inside the wood. Applying clear finish over a penetrated stain generally leaves the mark visible beneath the new coating. Pete’s Hardwood Floors defines screening as light abrasion for topcoat adhesion, not wood-level stain removal.
Recoating may also fail if wax, polish, oil soap, silicone, or other residue prevents adhesion. Those conditions require compatibility and adhesion testing rather than another layer of finish.
When spot repair is reasonable
Localized repair may be appropriate when:
- The affected area is small
- There is no active moisture
- The finish system is known and compatible
- The wood remains sound
- Solid flooring has sufficient material, or engineered flooring has a confirmed adequate wear layer
- A visible blend line or sheen difference is acceptable
Do not apply wood stain over an intact clear finish as though the stain were paint. Wood stain is generally intended to reach prepared raw wood, so color correction normally requires removing the coating in the repair area. Contractor guidance on screening likewise notes that marks inside the wood are not removed by recoating and that changing color generally requires sanding to bare wood. Naperville Hardwood explains this distinction.
Set realistic expectations. A deep water or urine stain may extend farther into the board than can be sanded safely. Bleaching may reduce a dark mark but produce a lighter one. Previously affected fibers may accept new stain differently, and fresh finish may not match the gloss or amber tone of the surrounding aged coating.
Engineered-floor limits
Before spot-sanding engineered hardwood, confirm:
- Product identity and manufacturer instructions
- Wear-layer thickness
- Whether it has been sanded previously
- Bevel depth and factory-finish characteristics
- Whether the intended finish system can be blended or recoated
If that information is unavailable, professional inspection is the safer choice. Aggressive sanding can expose the core or flatten bevels before the discoloration is removed.
When to replace boards
Board replacement becomes more appropriate when:
- Fibers are badly damaged or soft
- Discoloration is too deep to sand safely
- Odor or contamination affects the underside
- Only a small number of boards are severely affected
- Engineered flooring cannot be sanded adequately
- Earlier bleaching or repair attempts have created an unacceptable patch
Suitable donor boards from a concealed location may also help, but neither approach guarantees an exact result. Existing flooring changes with light exposure, wear, cleaning, and finish aging.
If several isolated repairs would create a patchwork of different colors and sheen, broader refinishing may produce a more consistent appearance. The decision is visual as well as technical: a slight mismatch beneath furniture may be acceptable, while a prominent entryway may justify refinishing to a natural boundary or across the room.
Know When to Stop and Call a Professional
Move from DIY stain removal to professional assessment if you find:
- An active leak or recurring moisture
- Cupped, swollen, lifted, or changing boards
- Soft, punky, or crumbling wood
- Flaking finish across multiple boards
- Visible growth
- Widespread blackening
- Flood exposure
- Persistent odor that appears to come from beneath the flooring
- Damage that continues changing after the surface dries
Correct the moisture source before cleaning, sanding, coating, or replacing boards. Otherwise, a cosmetic repair may conceal an active problem and then fail.
Severe water exposure requires restoration-oriented assessment rather than repeated surface treatment or improvised forced drying. Contractor guidance addressing flood-affected engineered flooring recommends water-damage restoration help when water may have reached the flooring construction or underlying materials. Naperville Hardwood discusses this boundary in its flood-damage response.
Professional evaluation is also sensible when:
- The finish is unknown
- The floor is engineered and its wear layer is uncertain
- The damaged area is visually prominent
- Matching color and sheen is critical
- A factory coating may require specialized preparation
- The mark crosses multiple boards or rooms
- Previous treatments have left residue or finish damage
A practical stop rule is: stop when the treatment changes the finish or wood faster than it changes the stain. Whitening, tackiness, roughness, color transfer, swelling, or a growing halo means the attempted cure is becoming a second problem.
Prevention cannot make wood immune to every stain, but it can protect the finish that provides the first line of defense:
- Blot spills immediately.
- Remove grit with sweeping, vacuuming appropriate for hardwood, or dry microfiber cleaning.
- Use mats where water or tracked soil is likely, without trapping moisture underneath.
- Maintain the protective finish with compatible products.
- Avoid standing water and saturated mops.
- Use only waxes, oils, or polishes intended for the existing finish.
Frequently Asked Questions
Can hydrogen peroxide remove a dark stain from hardwood without bleaching the floor?
It may lighten some dark discoloration, but there is no guarantee that it will preserve the surrounding color or finish. Peroxide is a color-altering treatment, not a routine cleaner. Its effect depends on the wood, porosity, coating, existing damage, amount applied, and exposure.
Do not use it on an unidentified floor or finish. Even if a patch test appears acceptable, repeated or larger applications may produce a pale halo or damage the topcoat. If preserving the existing finish is important, professional evaluation is the safer course.
Do vinegar and baking soda remove old black stains from hardwood?
They are not established as reliable removers of old discoloration that has penetrated the wood. Vinegar may remove some surface residue, but its acidity may affect certain finishes. Baking soda is abrasive and can change the sheen or wear the coating when rubbed.
If a black mark remains after removable residue is gone, diagnose its depth instead of repeating vinegar-and-baking-soda treatments. Wood-level discoloration may require access to raw wood, followed by sanding, controlled color correction, refinishing, or board replacement.
Will a screen-and-recoat remove water or pet stains?
Not if the discoloration has reached the wood. Screening lightly abrades the existing finish so a new coat can bond; it does not sand the floor to bare wood.
A recoat may improve shallow finish wear, but clear coating applied over penetrated discoloration generally leaves the mark visible underneath. Wood-level color correction requires a repair that reaches the affected fibers.
Can an engineered hardwood floor be spot-sanded?
Possibly, but only after confirming that the product has enough usable wear layer and that its manufacturer permits the repair. Engineered floors vary, and previous sanding reduces the material that remains.
If the product identity, wear-layer thickness, or repair history is unknown, consult a flooring professional before sanding.
Why does a pet-urine odor remain after the visible stain is cleaned?
The visible mark and odor may originate at different depths. Surface cleaning can remove accessible residue or improve the appearance while contamination remains in seams, board joints, undersides, adhesive, underlayment, or subfloor.
A hardwood-compatible enzyme cleaner may help with accessible residue, but it cannot necessarily reach material beneath the boards. Persistent odor after complete drying may require removal of affected boards and inspection of the underlying materials.
The final decision rule is straightforward: blot and dry fresh spills, diagnose old marks before treating them, begin with the least aggressive compatible cleaner, and stop when the finish or wood starts changing. A surface deposit may be cleanable. Discoloration inside the wood may require sanding, color correction, or refinishing. Active moisture, damaged fibers, deep odor, or widespread staining belongs in the repair or restoration category.