
How to Find the Moisture Source and Repair a Decaying Floor System
The durable sequence stops the moisture, identifies lost floor capacity, designs repairs around the load path and verifies the crawl space stays dry.
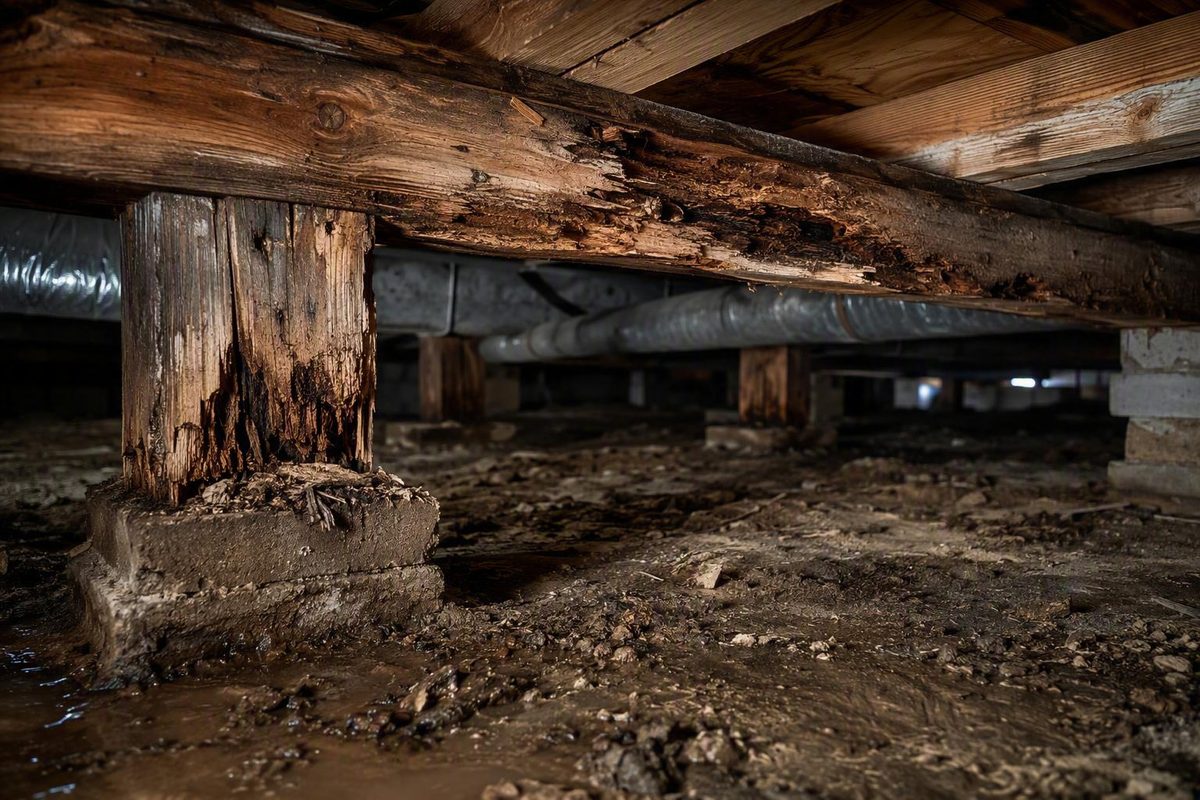
Wood rot in a crawl space is first a moisture problem and may also be a structural problem. The remedies overlap, but they are not interchangeable. A vapor barrier cannot restore a weakened joist, while replacement framing may decay again if the crawl space remains wet.
The durable sequence is to identify and stop the moisture, determine which parts of the floor system have lost capacity, design repairs around the load path, and verify that the corrected crawl space stays dry. Because concealed decay can make a floor unsafe, that process begins with deciding whether anyone should enter the area or continue walking over the affected floor.
This guide is intended for diagnosis, documentation, and contractor evaluation—not as a procedure for jacking a house or repairing structural framing without an onsite assessment.
Start With Urgency: Is the Crawl Space or Floor Unsafe?
Musty odors, staining, condensation, and damp insulation are moisture warnings that require investigation. Soft flooring, crumbling framing, visible loss of a joist or beam’s cross-section, unstable supports, and new floor movement are more urgent because they may indicate reduced structural capacity.
Arrange prompt qualified evaluation when you find:
- A newly sagging, dipping, or unusually bouncy floor
- Flooring or subfloor that feels soft underfoot
- Joists, beams, sill plates, or posts that crumble or compress easily
- Decay extending across several framing members
- Serious deterioration at a joist or beam bearing point
- A damaged beam or sill plate supporting multiple joists
- Leaning, displaced, corroded, or improvised supports
- Standing water near wiring, junction boxes, electrical equipment, or extension cords
- A floor area that appears unable to carry ordinary household loading
Severe localized decay can leave flooring unable to support an ordinary footstep. Affected flooring should therefore not be assumed safe merely because the surrounding structure still looks intact. The same engineering discussion identifies excessive deflection, localized floor deterioration, and punch-through as possible consequences of crawl-space decay. Vertex discusses localized floor-failure risk and deterioration of crawl-space supports.
If a floor is soft, sharply deflected, or deteriorated near a major support, keep people, pets, furniture, and stored materials away from it. Do not crawl beneath visibly unstable framing, disturb improvised supports, remove shims, or attempt to straighten the floor with a jack. Review the crawl-space hazards and DIY limits described by Dr. Lee’s Crawlspace Repair.
For an urgent case:
- Restrict access and loading. Keep people away from the questionable floor and do not enter beneath unstable framing.
- Stop active water only if that can be done from a safe location. For example, shut off a plumbing supply instead of crawling through standing water to reach a leak.
- Document visible conditions. Photograph the floor above, crawl-space entrance, water, stains, damaged members, supports, and apparent moisture source without disturbing them.
- Arrange structural and moisture evaluations. Depending on the evidence, that may involve a plumber, drainage specialist, pest professional, crawl-space contractor, or structural engineer.
These actions do not establish whether a joist is repairable. They reduce loading, preserve evidence, and help prevent an uncertain condition from becoming more dangerous.
Recognize Possible Rot—and What It Can Be Confused With
Wood rot is fungal decay of wood fibers associated with sustained moisture. It is not simply dark wood, a musty smell, surface growth, or an old water stain. The term “dry rot” is also used inconsistently and should not become a catchall for every form of crawl-space decay.
Possible signs include:
- Darkening, bleaching, or other discoloration
- Water stains or tide marks
- Cubical or block-like cracking
- Soft, spongy, or compressible areas
- Fibers that crumble, flake, or pull apart
- Visible fungal growth or unusual powdery material
- Persistent musty odors
- Wet, fallen, or sagging insulation
- Condensation on pipes, ducts, masonry, or framing
Symptoms can also appear above the crawl space. Excessive floor deflection, gaps where flooring meets walls or trim, localized deterioration, and newly bouncy or sagging areas may point to a support problem. They do not prove rot: settlement, displaced posts, weak connections, inadequate spans, damaged subflooring, and previous alterations can produce similar symptoms.
An inspection should consider the whole floor system rather than stopping at the first damaged joist. Potentially affected components include:
- Floor joists
- Girders and beams
- Posts and wood pier extensions
- Sill plates or mudsills
- Subfloor panels or boards
- Rim or perimeter framing
- Framing around vents and access doors
- Wood around pipes, drains, ducts, and utility penetrations
Decay may be concealed at intersections, penetrations, bearings, or places where subflooring meets supporting members. Olshan’s overview identifies beams, joists, pier extensions, sill plates, subflooring, and framing around openings as potentially affected areas.
Stained wood is not automatically rotten wood
The stain nevertheless records a past or present moisture condition that should be investigated. Conversely, a relatively ordinary-looking joist may be badly weakened at a concealed end bearing or beneath insulation.
Appearance and odor alone cannot establish:
- Whether fungal decay is active
- How far deterioration extends beneath the surface
- How much sound wood remains
- Whether connections and bearings remain effective
- Whether the member can carry its intended loads
- Whether replacement or reinforcement is necessary
The objective is not simply to label the wood “rot,” but to determine its physical condition and structural role.
Rot and insect damage can coexist
Termite and other pest damage can resemble fungal decay, and damp wood may be affected by both.
Do not assume all weakened wood is fungal damage. When insects or characteristic pest evidence are present, obtain a pest inspection. Pest treatment and structural restoration are separate scopes: eliminating an infestation does not restore lost wood, and replacing damaged wood does not demonstrate that an infestation has been eliminated.
Trace the Moisture Before Choosing a Repair
The wetness pattern can suggest where to investigate, but it is not a conclusive diagnosis. More than one source may be present. Exposed soil might create widespread humidity while a leaking bathroom drain causes severe localized decay.
Organize the investigation into six categories.
1. Plumbing or HVAC leaks
Suspect a localized leak when staining or deterioration is concentrated beneath:
- A bathroom, kitchen, laundry room, or water heater
- A supply pipe, shutoff, fitting, trap, or drain
- A refrigerator, dishwasher, toilet, tub, or shower
- An HVAC condensate line, drain pan, or air-handling component
Look for a defined stain, mineral deposits, wet insulation, dripping, or a moisture pattern radiating from one area. Test plumbing and equipment methodically rather than assuming the nearest fixture is responsible.
2. Roof or storm intrusion
Storm-driven water, roof leaks, failed flashing, wall penetrations, and exterior openings can deliver water to a crawl space even when the roof is well above the visible damage. Clues include staining that appears after wind-driven rain, dampness below an exterior wall, or a pattern associated with a penetration.
Because water can move through concealed cavities, the location where it reaches the crawl space may not be the point where it entered the building envelope.
3. Surface runoff
Runoff is more likely when:
- Water appears during or shortly after rain
- Dampness is concentrated near foundation walls
- Exterior soil slopes toward the house
- Gutters overflow
- Downspouts discharge beside the foundation
- Paved areas drain toward the building
- Foundation openings admit surface water
Inspect the exterior during safe weather. Check roof drainage, downspout terminations, low areas, erosion, and hard surfaces. The eventual correction might involve gutter maintenance, rerouted discharge, grading, or a site-specific exterior drainage solution.
4. Recurring groundwater
Groundwater becomes a stronger possibility when standing water repeatedly returns to a low point, soil remains saturated without recent rain, or surface-drainage maintenance does not solve the problem.
Recurring groundwater calls for a drainage assessment. Depending on the site and building, a suitable system may collect water and move it to a sump before discharging it away from the foundation. A sump pump manages collected water; it does not repair a plumbing leak or stop vapor from exposed soil.
5. Exposed-soil vapor
Bare earth can supply moisture to crawl-space air without producing a visible puddle. Clues include exposed soil, widespread dampness, broadly elevated readings, wet insulation, and no single concentrated source.
A ground vapor barrier can reduce moisture movement from soil, but it is only one part of a moisture-control design. Its presence does not eliminate the need to investigate leaks, runoff, or groundwater.
6. Humid-air condensation
Warm, humid air can condense on cooler ducts, pipes, masonry, or framing. Widespread condensation, sweating ductwork, damp insulation, and seasonal moisture without a clear leak can indicate an air-and-temperature problem.
Simplistic ventilation advice is risky because outdoor air may promote drying under some conditions and worsen condensation under others. Vented, sealed, encapsulated, and conditioned crawl spaces are different systems; the appropriate design depends on the climate, building, moisture sources, mechanical equipment, and locally adopted requirements.
A cause-first mini-flowchart
Use this as an investigation guide, not as a final diagnosis:
-
Active water concentrated at one point → Investigate plumbing, drains, fixtures, HVAC condensate, and equipment.
-
Water or dampness correlated with rain → Check gutters, downspouts, grading, exterior penetrations, and surface drainage.
-
Water repeatedly returning at a low point → Evaluate groundwater, collection, drainage, discharge, and sump options.
-
Widespread humidity, damp soil, or condensation → Evaluate soil vapor, air leakage, insulation, condensation, dehumidification, and the overall crawl-space design.
Do not make encapsulation the automatic first response. It may form part of an integrated system, but it cannot repair a failed pipe, reverse poor grading, or make uncontrolled groundwater disappear. Wet-crawl-space guidance similarly distinguishes plumbing leaks, surface water, groundwater, condensation, and soil vapor because the controls are not interchangeable. Michaelis Corporation compares source-specific uses for drainage, sump pumps, vapor barriers, dehumidification, and encapsulation.
Inspect and Document the Damage Without Overreading a Moisture Number
A useful inspection records conditions systematically. Close-up photographs of the worst-looking joist are not enough to explain where the water originated, what else is affected, or how the floor system is behaving.
A cautious diagnostic sequence is:
- Identify active water and immediate hazards.
- Photograph conditions before moving insulation or debris.
- Map staining, condensation, standing water, and wet-soil patterns.
- Locate and test the suspected moisture source.
- Identify each visibly affected structural and nonstructural component.
- Record the visible extent and physical character of deterioration.
- Relate movement above to supports and framing below.
- Take comparison moisture readings.
- Repeat observations after source correction and drying.
- Obtain a written report that distinguishes observations from hypotheses.
Map every affected component
Label joists by position or number and record damage along their lengths. Note beams, posts, sill plates, rim framing, subfloor areas, penetrations, insulation, and fasteners. Include apparently sound components beside damaged ones for comparison.
For each location, record:
- Whether the wood is stained, wet, soft, cracked, hollow, or crumbling
- Approximate dimensions of the visible area
- Whether damage is near an end bearing, notch, hole, or connection
- Its relationship to plumbing, exterior walls, and crawl-space low points
- Moisture readings and the instrument used
- Whether insulation, ducts, or finishes conceal adjacent areas
Floor elevations or pitch measurements can help relate a sag above to supports below. Movement is not proof of rot, however. Settlement, displaced posts, inadequate spans, altered framing, and failed connections may also cause deflection.
What a moisture reading does—and does not—mean
Some supplied industry sources associate persistent wood-moisture readings around 19% to 20% with conditions favorable to fungal decay, particularly when the wood cannot dry. That range is a warning context, not a universal pass-fail threshold. One reading does not prove active rot, establish remaining strength, or determine whether a member must be sistered or replaced. Vertex discusses moisture readings of 19% or more in relation to decay risk while emphasizing sustained moisture and physical deterioration.
Interpret readings alongside:
- Physical softness, cracking, crumbling, or section loss
- The location of deterioration within the member
- Comparison readings from apparently unaffected wood
- The known history and duration of wetting
- Trends observed after the source is corrected
Take readings at multiple comparable locations rather than searching for one definitive number. Repeat them over time. For instrument-specific operation and limitations, follow the manufacturer’s instructions or obtain qualified measurement guidance.
Build a record before demolition
If an insurance claim may be possible, preserve evidence before damaged material is removed, provided doing so does not delay necessary safety work. Record:
- Wide photographs establishing location
- Close photographs of deterioration, staining, bearings, and connections
- Video showing the route from the access opening to the affected area
- Moisture readings and labeled measurement locations
- Standing water and staining patterns
- The discovery date
- A weather, storm, or leak timeline
- Failed pipes, fittings, valves, drains, or equipment
- Prior inspection, plumbing, roofing, and pest reports
- Written assessments and repair estimates
- Relevant policy documents and correspondence
Insurance-focused guidance recommends preserving photographs, moisture readings, failed parts, dates, reports, and estimates because demolition can eliminate evidence of the original condition. Public Loss Adjusters provides a crawl-space evidence checklist for possible claims.
Ask for a written inspection report that separates observed conditions, suspected cause, affected components, structural concerns, and recommended tests or repairs. A visible stain is an observation; attributing it to a particular storm, pipe, or drainage failure may remain a hypothesis until tested.
Use the Correct Order of Work: Water Control Before Structural Restoration
The work should follow the cause and the condition of the structure:
- Stop active bulk water and leaks.
- Establish drainage, vapor, humidity, and drying controls suited to the source.
- Address damaged insulation, fungal contamination, and pests as applicable.
- Assess the capacity of framing, bearings, and connections.
- Repair, reinforce, or replace compromised components.
- Verify structural performance and monitor for recurring moisture.
Some steps may overlap. Temporary stabilization might be necessary before workers can safely correct water or remove concealed materials. The central principle is that new lumber is not a remedy for an active moisture problem.
Replacing decayed wood first can conceal evidence and expose the replacement material to the same conditions. Contractor guidance on rot and pest damage likewise advises correcting plumbing, groundwater, grading, gutter, and pest problems before treating framing work as complete. Thrasher explains why water and pest sources should be corrected before damaged wood is replaced or reinforced.
Match the control to the source
Plumbing or HVAC leak: Repair the failed supply line, drain, fitting, fixture, pan, or condensate system. Test the repair under operating conditions and inspect for water that traveled beyond the visible stain.
Surface runoff: Clean or repair gutters, route downspouts appropriately, correct soil or hardscape that drains toward the building, and evaluate exterior drainage where needed.
Recurring groundwater: Obtain a site-specific drainage assessment. A suitable design may involve collection, drainage, and a sump with discharge away from the foundation.
Ground vapor: Consider a properly detailed ground vapor barrier as part of the moisture strategy. Seams, penetrations, edges, piers, and walls all require attention; loosely placing plastic over soil is not the same as creating a coherent system.
Persistent humidity or condensation: Evaluate air leakage, ducts, insulation, seasonal outdoor humidity, and the existing crawl-space design. Depending on the building and climate, the solution may include air sealing, encapsulation, dehumidification, or a conditioned design.
These measures solve different problems:
| Measure | What it can address | What it cannot do by itself |
|---|---|---|
| Leak repair | Stops a failed plumbing or equipment source | Control groundwater or soil vapor |
| Grading and downspout work | Reduces surface water near the foundation | Repair plumbing or restore wood strength |
| Drainage and sump system | Collects and removes recurring water | Stop all vapor or repair framing |
| Ground vapor barrier | Reduces vapor movement from exposed soil | Stop every leak or manage uncontrolled bulk water |
| Encapsulation | Forms part of a sealed moisture-control design | Replace source diagnosis or structural repair |
| Dehumidifier | Removes moisture from crawl-space air | Stop bulk water or repair a leak |
| Fungal cleaning or treatment | Addresses a defined contamination scope | Rebuild wood fibers destroyed by decay |
| Structural repair | Restores a defined load path | Keep new framing dry without moisture control |
Moisture control, fungal cleanup, pest treatment, and structural restoration should be written as separate scopes, even if one contractor coordinates them. Each has a different objective and completion test.
Ventilation is likewise a system decision: opening vents is not universally correct, and neither is sealing them. Before changing the design, determine whether the crawl space is intended to operate as vented, sealed, encapsulated, or conditioned, and confirm local requirements.
Choose Between Sistering, Reinforcement, and Replacement
The correct structural repair depends on what remains sound and how loads reach the foundation. It cannot be selected solely from the appearance of the middle of one joist.
Sistering
Sistering means installing new framing alongside a damaged member so the new member can share or assume load. Before specifying it, a contractor or engineer may need to evaluate:
- The location and length of decay
- The amount of sound wood that remains
- End-bearing conditions
- The joist’s span and supports
- The subfloor and existing connections
- Available fastening and access
- Pipes, wires, ducts, and blocking
- The intended load path
- Local permit or engineering requirements
The repair design should explain how load enters the new member and reaches sound support.
Reinforcement and supplemental support
Possible site-specific alternatives include:
- Reinforcing a beam
- Adding a designed steel element
- Installing a supplemental beam
- Adding permanent supports on suitable foundations
- Repairing connections
- Replacing complete components
These are not interchangeable products. Before approving a proposal, ask the designer to identify the loads, bearings, connections, supports, foundation conditions, and changes to the existing load path. Those questions require site-specific structural evaluation rather than a generalized online detail.
Replacement
Potentially affected components include:
- Individual or multiple joists
- Girders and beams
- Posts or wood pier extensions
- Sill plates
- Rim framing
- Subflooring
- Framing around utility or access penetrations
Subfloor decay can complicate access.
Visible deterioration may understate the scope because decay can extend into concealed joist ends, bearings, subfloor edges, sill plates, rim framing, or adjacent members. Proposals should therefore include a written process for documenting and approving concealed work discovered during opening—not unlimited authorization to expand the project.
When to involve an independent structural engineer
Consider independent engineering review when:
- Several joists are affected
- Deterioration reaches a beam, girder, sill plate, or major connection
- The floor has substantial movement
- Foundation cracking or movement is present
- Supports appear improvised or displaced
- The load path is uncertain
- Extensive jacking or a proprietary support system is proposed
- Contractors recommend materially different repairs
- The local authority requires calculations or drawings
That distinction is especially useful when a proposal changes bearings, spans, beams, posts, or foundations.
For related discussion of floor movement and support sequencing, see HFI Flooring’s guide to diagnosing a sagging floor over a crawl space. Structural jacking and permanent support design remain separate from the moisture and decay diagnosis addressed here.
Decide Who to Call, What to Ask, and What Drives the Cost
The first call should follow the strongest evidence rather than the most heavily advertised product.
Specialist decision guide
- Suspected supply, drain, fixture, or condensate leak: Call a plumber or appropriate HVAC professional.
- Rain-related runoff, poor grading, or recurring groundwater: Call a drainage or waterproofing specialist familiar with local conditions.
- Mud tubes, frass, galleries, hollowed wood, or active insects: Call a licensed pest professional.
- Significant load-bearing deterioration, floor movement, foundation movement, uncertain supports, or disputed repair designs: Call a structural engineer.
- Coordinated drying, insulation, moisture-control, and framing work: A qualified crawl-space or general contractor may organize the scopes.
A contractor may coordinate the project effectively, but uncertainty can arise when the same company diagnoses structural damage and sells the proposed support system. Independent engineering review can help define the problem before a large or irreversible repair is authorized.
Set sensible DIY boundaries
A capable homeowner may be able to:
- Observe conditions from a safe access point
- Photograph visible damage
- Record odors, weather, and leak timing
- Monitor moisture trends
- Maintain accessible gutters and downspouts
- Remove accessible exterior drainage obstructions
Standing water, electrical exposure, widespread growth, unstable framing, difficult confined access, structural jacking, and framing repairs warrant qualified help. When hiring, verify applicable licenses, insurance, relevant certifications, reviews, warranties, and whether engineering, permits, inspections, and follow-up visits are included. Permadry’s contractor checklist summarizes these basic hiring considerations.
What a useful bid should contain
Require each proposal to address:
- The documented or suspected moisture source
- A map or list of affected components
- Additional testing required
- Active-water correction
- Drainage, vapor, humidity, and drying controls
- Insulation removal or replacement
- Pest or fungal work, if applicable
- A separate structural scope
- The intended load path
- Framing sizes, materials, connections, bearings, and supports
- Engineering responsibilities
- Permit and inspection responsibilities
- Protection of floors, finishes, ducts, wiring, and plumbing
- Exclusions
- The process for concealed damage
- Post-repair moisture and structural verification
- Itemized pricing
- Warranty terms and maintenance requirements
Compare proposed solutions rather than total prices alone. One bid might include drainage, drying, engineering, and finish restoration, while another covers only joist work. Those prices are not directly comparable if one leaves the water source or concealed work unresolved.
What drives the cost
Reliable pricing requires a site-specific scope. Major cost drivers include:
- Diagnostic testing and written reports
- Plumbing, HVAC, roof, or exterior-envelope repairs
- Grading and drainage work
- Sump and discharge equipment
- Vapor and humidity controls
- Crawl-space height and access
- Demolition and debris removal
- Insulation removal and replacement
- Drying time and equipment
- Pest treatment or fungal cleanup
- The number and type of framing components involved
- Damage at bearings and connections
- Finished-floor or interior access
- Temporary stabilization
- Engineering and drawings
- Permits and inspections
- Local labor and material conditions
- Concealed damage discovered after opening
Cramped access and structural involvement can increase labor because materials, tools, temporary supports, and debris must pass through a restricted area. Contractor-published regional price ranges should not be treated as national averages or estimates for a particular house.
Require written change orders when demolition reveals concealed damage. A change order should identify what was found, show its location, explain how it changes the agreed repair, and state the added cost and schedule before work proceeds, except when immediate stabilization is necessary for safety.
Protect a Possible Claim and Verify That the Repair Lasts
Insurance treatment generally depends on the documented cause, timing, exclusions, and exact policy language—not merely on the presence of rotten wood. Long-term humidity, deterioration, poor ventilation, or maintenance-related moisture may be treated differently from a sudden water or storm event, but coverage cannot be predicted without reviewing the policy and facts. Public Loss Adjusters explains these cause, timing, and policy-language distinctions.
Before demolition, preserve:
- Wide and close photographs
- Video of the location and access route
- Water, staining, and condensation patterns
- Moisture readings with labeled locations
- The discovery date
- A weather, storm, or leak timeline
- Failed plumbing or equipment components
- Prior inspection and maintenance reports
- Written findings from contractors, inspectors, or engineers
- Repair estimates
- Policy documents and insurer correspondence
Stop or contain active water when safe. Retain a failed pipe, fitting, valve, or other component when practical, and avoid discarding damaged wood until it has been documented.
Documentation must not delay emergency measures needed to protect people or prevent continuing damage. If a floor may fail, water threatens electrical equipment, or a leak is actively spreading, address the immediate hazard and document conditions as circumstances allow.
Post-repair verification checklist
A repair is not complete merely because the crawl space contains new lumber. Verify that:
- The plumbing, HVAC, roof, or exterior leak has been repaired and tested
- Surface drainage no longer directs water toward the foundation
- Gutters and downspouts operate and discharge appropriately
- Drainage channels remain unobstructed
- A sump system, if installed, activates and discharges correctly
- Ground vapor controls remain intact
- The selected vented, sealed, encapsulated, or conditioned design operates coherently
- Humidity and wood-moisture trends decline and remain controlled
- Repaired members match the approved structural scope
- Required bearings, supports, and connections were installed
- Adjacent framing remains firm and dry
- Removed insulation has been addressed
- Musty odors, stains, condensation, and floor movement do not return
- Required permit inspections or engineering observations are complete
Schedule periodic crawl-space checks and inspect again after unusual flooding, major storms, or serious plumbing leaks. Record readings in the same identified areas so that trends are meaningful.
A cause-first homeowner checklist is straightforward:
- Restrict access if framing or flooring appears unstable.
- Stop active water when it is safe to do so.
- Document the original condition.
- Determine whether the moisture pattern is localized or widespread.
- Obtain plumbing, drainage, pest, moisture, and structural assessments suited to the evidence.
- Correct the water source.
- Restore only the components identified by the resulting structural scope.
- Verify moisture control and structural performance afterward.
A successful outcome combines a restored load path with controlled moisture. New wood is not a durable repair if the crawl space remains wet, while encapsulation or surface treatment is not a structural repair after decay has reduced capacity.
Frequently Asked Questions
Does a 19% or 20% wood-moisture reading prove that a joist is rotten?
No. Persistent readings around 19% to 20% are reported as conditions associated with elevated decay risk when wood cannot dry, but the number alone does not prove active fungal decay or establish remaining structural capacity.
Interpret readings with the wood’s physical condition, location, moisture history, and comparison measurements. Softness, crumbling, section loss, damaged bearings, and impaired connections are relevant to structural assessment. Repeat readings after correcting the source to determine whether the wood is drying or becoming wet again.
Can a rotted floor joist be sistered instead of replaced?
Sometimes. Sistering may be appropriate when a repair can connect to adequate sound structure and establish suitable support, fastening, and load transfer. The decision depends on the location and extent of decay, joist-end condition, access, adjacent supports, subfloor connections, and local engineering or permit requirements.
A sister attached mainly to severely deteriorated material—or one that does not connect the damaged area to suitable support—does not automatically restore the intended load path. Extensive deterioration or damage involving beams, sill plates, or critical bearings may require replacement or another site-specific design.
Should crawl-space vents be opened, closed, or sealed when rot is found?
There is no universal answer. Vented, sealed, encapsulated, and conditioned crawl spaces operate differently. Climate, seasonal outdoor humidity, insulation, ductwork, soil vapor, drainage, mechanical systems, building configuration, and local requirements all affect the appropriate strategy.
First identify whether moisture comes from a leak, runoff, groundwater, exposed soil, condensation, or humid outdoor air. Then select a coherent design. Opening vents may promote drying under some conditions but introduce humid air under others; sealing vents without controlling bulk water or soil vapor may also fail.
Will homeowners insurance cover wood rot caused by a crawl-space leak?
Possibly, but coverage cannot be inferred from the words “leak” or “wood rot.” The outcome depends on the source, timing, duration, exclusions, maintenance history, resulting-damage provisions, and exact policy language. Sudden water damage may be treated differently from long-term seepage, humidity, deterioration, or an unresolved maintenance condition.
Contain ongoing water when safe, notify the appropriate parties, and preserve photographs, readings, failed components, reports, and dates. Do not postpone necessary emergency work solely to preserve evidence.
Who should I call first for crawl-space wood rot?
Follow the clearest clue:
- Call a plumber or HVAC professional for a suspected supply, drain, fixture, equipment, or condensate leak.
- Call a drainage or waterproofing specialist for rain-related runoff, grading problems, or recurring groundwater.
- Call a pest professional for mud tubes, frass, galleries, hollowed wood, or active insects.
- Call a structural engineer for major decay, several affected joists, damaged beams or sill plates, substantial floor movement, uncertain supports, or conflicting repair plans.
- Call a qualified crawl-space or general contractor when the project requires coordinated drying, insulation, moisture-control, and framing work.
If the floor may be unstable, restrict access first. Do not enter beneath questionable framing or begin jacking while deciding whom to hire. The correct first professional is the one qualified to investigate the strongest evidence without assuming that every crawl-space problem requires the same product or repair system.