
When a Fil-Stik Works—and When Your Repair Needs Something Stronger
Suitability turns on stable, shallow cosmetic damage in a location where the fill need not restore strength or withstand demanding wear.
By Dev Okonjo · Updated August 12, 2026
A Mohawk Fil-Stik can make a nail hole, nick, or shallow gouge less noticeable without mixing filler or using a heating tool. Its convenience, however, can obscure an important limitation: it is primarily a color-matched cosmetic filler, not a universal repair for damaged wood.
The right question is not simply whether Fil-Stik will fit inside a defect. It is whether the damage is stable, shallow enough for a cosmetic intervention, and located where a wax- or putty-style fill will not be expected to restore strength or withstand demanding wear.
This is a retailer-sourced product overview rather than a report of independent laboratory testing or personal Fil-Stik testing. The available evidence does not include a verified technical data sheet establishing maximum fill depth, coverage, finish compatibility, or long-term durability. Within those limits, this guide explains how sellers describe Mohawk Fil-Stik, how to evaluate damage, choose a color and model number, apply the product without heat, and decide between an individual stick, an assortment, or a stronger repair material.
What Is a Mohawk Fil-Stik?
“Fill stick” describes the format and function; “Fil-Stik” is the name used in product listings and catalogs.
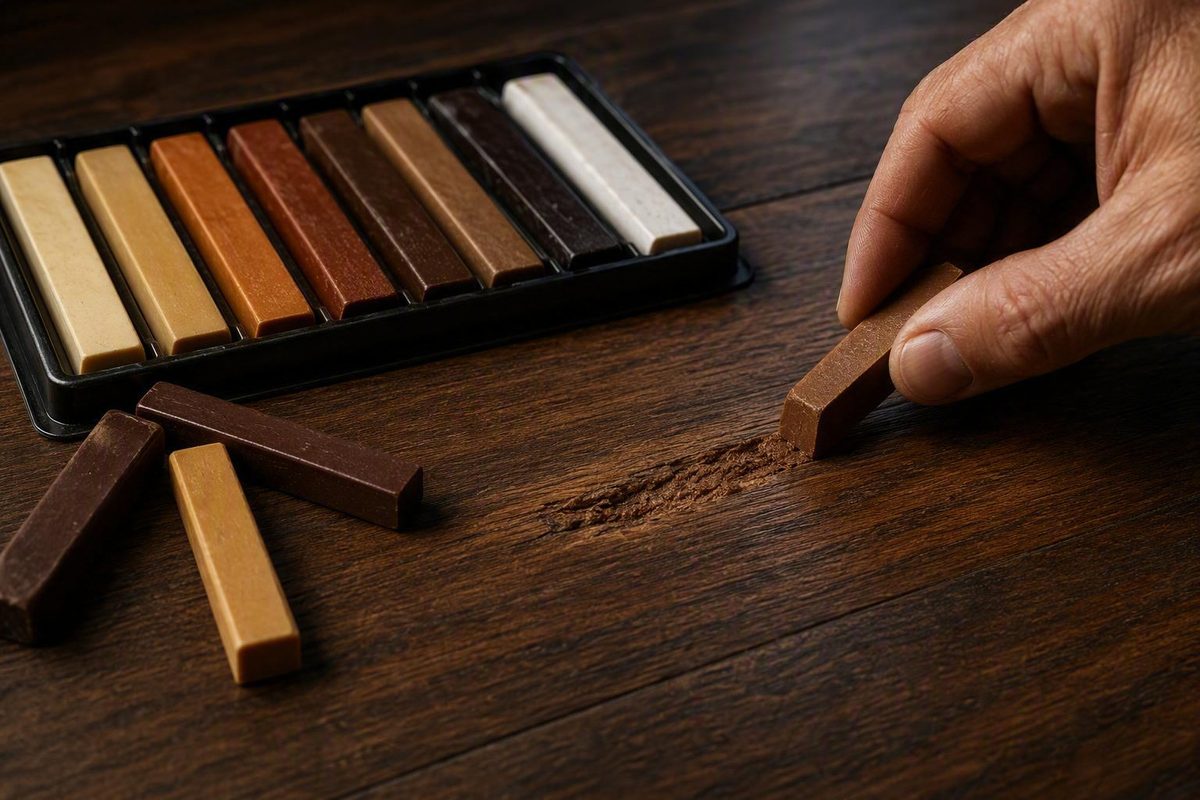
Amazon and specialist retailers variously describe Fil-Stik as a semi-hard wax, wax putty stick, semi-hard filler, or putty-style stick. Wood-repair terminology is not consistent across sellers, but the basic function is clear: the stick deposits colored material into a small surface defect. An Amazon Fil-Stik listing describes it as a wax putty stick intended for cosmetic wood repair without heat or specialized tools.
That makes Fil-Stik different from both liquid filler and a color-only marker:
- It is not mixed from separate components.
- It is not dispensed from a tube.
- It is not designed to be melted with a burn-in knife or heating tool.
- It does more than recolor exposed wood: it places material in a shallow void while supplying a selected color.
The action is mechanical. You rub the stick across or into the defect, leave material in the recess, remove the excess, and blend the remaining fill with the surrounding surface.
Retailer descriptions identify the following applications:
- Minor scratches that include a shallow depression
- Nicks and surface blemishes
- Nail holes
- Small gouges
- Cracks and voids
- Open corner joints
Furniture and cabinets are the most consistently documented settings. Trim, paneling, and picture frames also appear in seller descriptions. Wood-floor touch-ups appear in retailer guidance, but those references do not establish compatibility with every wood species, factory finish, site-applied coating, or traffic condition.
The distinction between filling and recoloring matters. If material is missing or the damage includes a small recess, a filling product such as Fil-Stik is more relevant.
Most available instructions and performance descriptions come from retailer pages, marketplace listings, or retailer-authored comparisons. They help identify intended uses and commonly stated application methods, but they are not substitutes for independent wear testing or comprehensive manufacturer compatibility documentation.
Damage Triage: Where Fil-Stik Fits and Where It Does Not
A sensible repair begins by classifying the defect according to three factors:
- Severity: Is it a color blemish, a shallow void, or substantial material loss?
- Location: Is it on a protected cabinet face, an exposed edge, or a busy floor path?
- Expected wear: Will the repair mostly be viewed, or will it be walked on, gripped, heated, cleaned, or struck repeatedly?
Fil-Stik is most plausible when the defect is small, stable, non-structural, and mainly needs visual concealment. Possible candidates include a cabinet nail hole, a minor furniture nick, a shallow gouge, or a modest void in a finished surface.
“Stable” is as important as “small.” A narrow crack that continues to move is not necessarily a suitable Fil-Stik repair. Neither is an open corner joint caused by loose construction, even if the visible gap can accept the material. Filling a moving joint does not correct the movement.
Likely Fil-Stik repairs
Consider Fil-Stik when all or most of the following are true:
- The surrounding wood and finish are firmly attached.
- The defect does not affect the item’s strength or operation.
- Only a small amount of material is missing.
- The goal is primarily to reduce visual contrast.
- The location receives light handling or limited abrasion.
- A close prematched color is available.
- The repair will not need to hold a screw or another fastener.
Retailer descriptions support cosmetic improvement, not restoration of lost structural strength. Fil-Stik should not be expected to reconnect wood fibers, stabilize rot, rebuild a load-bearing section, or make a loose joint sound.
Damage that needs another approach
Investigate a hardening filler, a suitable two-part repair compound, replacement wood, joinery work, or professional advice when you encounter:
- A deep or spreading crack
- A broken or missing corner
- Significant missing wood
- A damaged edge that will be bumped or gripped
- Rot, softness, moisture damage, or delamination
- A loose joint
- A defect that must bear weight
- A hole that must later hold a fastener
- Damage affecting the safe operation of furniture, cabinets, stairs, or flooring
These conditions require more than color. They may involve adhesion, hardness, mechanical reinforcement, moisture diagnosis, or replacement of unsound material.
Frequently handled surfaces deserve additional caution. A fill on a display cabinet faces a different service environment from one on a drawer-pull area, tabletop edge, chair arm, or kitchen work zone. Likewise, a floor repair beneath furniture is not equivalent to one in the center of a busy walkway.
A retailer-authored comparison characterizes Fil-Stik as a low-durability option for cosmetic work and places heated burn-in materials or epoxy products in categories for deeper damage. That is commercial guidance rather than an independently tested durability ranking, but it supports a conservative distinction between a no-heat cosmetic fill and a hard or structural repair system. The retailer comparison separates Fil-Stik from heated and two-part repair products.
A compact decision tree
Use this sequence before buying:
-
Does the defect need only color? If there is no meaningful recess or missing material, consider a touch-up marker.
-
Is there a shallow, stable cosmetic void? Fil-Stik may be appropriate if the color can be matched and the location does not face unusually demanding wear.
-
Is the cosmetic damage deeper or more exposed? Investigate a harder wax, heated burn-in product, or another filler intended for that surface and finish.
-
Is wood missing, loose, rotten, broken, or strength-bearing? Use an appropriate hard filler, two-part repair system, replacement wood, or structural repair method. Correct the cause before concealing the surface.
There is no verified universal width or depth limit in the available Fil-Stik evidence. Avoid unsupported rules such as “anything under a quarter inch is safe.” Defect shape, substrate condition, edge exposure, finish type, movement, and wear can matter as much as dimensions.
How to Choose a Fil-Stik Color and Model Number
Color selection is often the hardest part of a successful repair. Fil-Stik remains visible at the surface, so even a neatly leveled fill can attract attention if it is too light, dark, red, yellow, or gray.
Fil-Stik is sold in numerous named colors, commonly under M230-series identifiers. Some specialist listings also show M231-series item numbers. Documented examples include:
- Saddle
- Stone
- Shale
- Espresso
- Driftwood
- Argent Oak
- Silver Elm
- Silver Walnut
- Harbor
- Medium Rock Maple
- Deep Mahogany
- Statesman Oak
- Cherry/Nutmeg
- Snowdrift
- Gun Metal Grey
- Burgundy Trace
These examples are not a complete or guaranteed-current color range. The captured seller tables are incomplete, and individual colors may be renamed, unavailable, discontinued, or listed differently across sellers. A Fil-Stik catalog page shows M230-series colors and assortments, but current stock and product status should be confirmed before ordering.
Search by both shade and SKU
Once you identify a candidate, search using the exact color name and full model number together—for example, Fil-Stik Harbor M230-0183. A specialist retailer identifies Harbor by that model number, helping distinguish it from similarly named products or repair pencils.
Model numbers are useful because marketplace titles sometimes contain spelling errors, shortened names, or catalog inconsistencies. Confirm the number in the product specifications rather than relying only on a search-result heading.
After finding a successful match, record:
- Brand and product type
- Exact color name
- Complete SKU or model number
- Seller and purchase date
- Item or finish on which the shade matched
A photograph of the label beside the repaired object can make future reordering easier.
Why the wood species name is not enough
“Walnut,” “maple,” “oak,” or “cherry” may establish a broad color family, but species alone does not determine the visible color. Appearance is also affected by:
- Stain or dye
- Clear finish
- Finish aging and ambering
- Sunlight exposure
- Surface sheen
- Natural grain variation
- Contrasting pores or figure
- Room-lighting color temperature
Online swatches are only a starting point. Neither a color name nor a product photograph guarantees an exact match.
A conservative matching workflow
-
Identify the dominant background tone. Match the field color around the defect rather than the darkest grain line, unless the damage lies directly within that line.
-
Collect nearby candidates. When practical, compare a slightly lighter, slightly darker, and differently toned option instead of committing from one screen image.
-
Evaluate them in the room. Check the colors under the lighting in which the item is normally seen. Daylight and warm evening lighting can produce different impressions.
-
Test inconspicuously. Use a concealed area when practical, especially on a prominent cabinet door or furniture face.
-
Begin with very little material. It is easier to add another pass than to manage a broad, conspicuous patch.
-
Inspect from normal viewing distance. A match that looks imperfect from a few inches away may disappear at ordinary distance. Conversely, a sheen mismatch may remain obvious even when the hue is close.
General wax-filler practice sometimes involves combining nearby colors, but the available evidence does not establish an official Mohawk blending procedure for standard Fil-Stik. If you experiment, do so on a hidden area or comparable finished sample. Avoid enlarging a small defect into a broad multicolor patch.
Perfect color identity may be unrealistic on strongly figured wood. The practical goal is often to reduce contrast so the eye no longer goes directly to the damage.
How to Apply a Mohawk Fil-Stik Without Heat
Standard Fil-Stik listings say no heat or specialized repair tool is required. Do not confuse Fil-Stik with a burn-in or melt-in stick, which belongs to a separate product category and is applied with controlled heat.
A specialist listing for Harbor, model M230-0183, instructs users to work on a clean, dry surface, rub the material into the void, and remove excess with a cloth, plastic leveling card, or spatula. The Harbor Fil-Stik listing documents that no-heat application method.
1. Inspect the damage
Confirm that the defect is:
- Dry
- Stable
- Free of loose wood or finish
- Cosmetic rather than structural
- Suitable for a direct color-matched fill
Stop if the area is soft, rotten, damp, delaminating, or moving. A cosmetic fill can conceal a symptom without correcting the underlying problem.
2. Remove loose contamination
Clear away dust, fragments of finish, and loose debris. Remove ordinary surface contamination gently, taking care not to enlarge the damage or abrade the surrounding sheen.
The available evidence does not support one universal solvent or cleaner for every surface. If more than dry dust removal is necessary, first determine what the original finish can tolerate.
Allow the area to become fully dry before filling.
3. Check the shade
Test the selected color in a concealed location when practical. This is particularly important on a prominent cabinet door, tabletop, high-gloss surface, or another area where a mismatch would be obvious.
Do not judge only from the end of the stick.
4. Rub material into the void
Move the stick across or into the defect with controlled pressure so material transfers into the recess. Work from more than one direction if necessary to reach the sides of a nail hole or irregular nick.
Use incremental passes. Deliberately creating a large mound produces more cleanup and increases the chance of spreading material over the surrounding finish. The objective is to fill the recess, not coat a broad area.
5. Level the excess
Use a non-scratching option identified in retailer instructions:
- A clean, soft cloth
- A plastic leveling card
- A plastic spatula
- A similar smooth plastic tool
Keep the tool nearly flat and remove excess conservatively. Avoid digging into the repair, which can pull the material back out of the defect.
Do not use an unprotected metal scraper. Check even a plastic card for burrs or embedded grit before it touches the surface.
6. Buff and inspect
Buff or blend the area gently with a clean, soft cloth. Examine it:
- From more than one angle
- Under normal room lighting
- At ordinary viewing distance
- With side lighting that can reveal a proud fill
If the repair remains recessed, add a small amount and repeat. If it stands proud, remove excess conservatively rather than pressing harder across a larger area.
The available evidence does not establish an exact cure time, quantified coverage, or maximum fill depth. Do not borrow specifications from an unrelated wax, putty, or filler product.
Example: a cabinet nail hole
First confirm that the hole is left from removed trim or hardware and will not need to hold another fastener. Remove loose debris and make sure the surface is dry. Test the shade in a hidden spot, rub a small amount into the hole, level it with a clean plastic card, and buff gently. Reassess the color before adding more.
Example: a shallow furniture nick
Check that the finish surrounding the nick is firmly attached. Match the dominant background color, test inconspicuously, and rub the stick across the recess in short passes. Level it with a plastic tool or soft cloth, then inspect from the angle at which light normally strikes the furniture. Stop once the nick no longer draws attention; enlarging the filled area can make the repair more visible.
Topcoating, Wear, and Troubleshooting
Specialist retailers say a Fil-Stik repair may be protected with Tone Finish aerosol or another coating. That seller guidance does not establish that every lacquer, polyurethane, paint, flooring finish, or aerosol product will adhere properly over the filled area. A specialist Fil-Stik page mentions Tone Finish and other coatings, but it does not demonstrate universal coating compatibility.
A topcoat introduces several variables:
- Whether the coating adheres over the fill
- Whether its solvents soften or smear the material
- Whether it changes the repair color
- Whether it creates a sheen mismatch
- Whether it remains clear over time
- Whether the surrounding original finish tolerates it
Verify the complete coating system before treating a prominent area. When possible, reproduce the proposed fill-and-topcoat combination on a concealed area or comparable finished sample.
Seller claims concerning permanence, fade resistance, non-bleeding behavior, waterproofing, or improved durability are not independently demonstrated in the available evidence. Nor is there independent test data here for abrasion, household cleaners, moisture, heat, repeated handling, floor traffic, topcoat adhesion, or reliable redo procedures.
Can the fill be sanded or stained?
Conventional colored wax putty is generally selected to match an existing finished surface rather than sanded and stained afterward. Wood-repair terminology is inconsistent, but hardening filler is more commonly associated with unfinished or prepared wood and later sanding, while putty is more commonly used for small repairs after finishing. A general comparison of wood putty and wood filler says conventional putty is not treated like a sandable, stainable hardening filler.
Choose the Fil-Stik shade as though it will remain the visible repair color. Do not plan on sanding, staining, drilling, or fastening into it unless current documentation for the exact product explicitly supports that use.
If the fill stands proud
Start with gentle buffing using a clean, soft cloth. If further leveling is necessary, use a smooth plastic card or spatula and remove only the material above the surrounding surface. Check frequently under side lighting.
Do not increase pressure recklessly. Scratching the finish or pulling all the material from the void defeats the repair.
If the color looks wrong
Stop before expanding the filled area. Remove only readily accessible excess with a soft cloth or non-scratching leveler, then reassess the shade under the room’s normal lighting.
A slightly dark fill may sometimes be less conspicuous than an overly light one, but that is not a universal rule. Grain, sheen, lighting, and defect position all affect the result. Testing an alternative is safer than repeatedly spreading the wrong color.
No solvent-based removal procedure can be recommended from the available evidence. Identify the substrate and coating before considering chemical removal.
If the repair wears away
Reconsider the product category rather than repeatedly applying the same material. The location may require a harder filler or a repair integrated with the surrounding coating. Wear can also indicate movement, contamination, failure of the original finish, or a defect too deep for this kind of cosmetic fill.
On a heavily trafficked floor, treat Fil-Stik as a cautious cosmetic intervention—not a proven permanent repair.
Fil-Stik vs. Markers, 3-in-1 Tools, Burn-In Sticks, Putty, and Epoxy
Repair-product names overlap, so choose by function rather than by the word “stick.” This comparison synthesizes retailer guidance and general product-category distinctions; it is not an independent durability test.
| Product category | Primary function | Suitable damage | Heat required? | Major limitation |
|---|---|---|---|---|
| Touch-up marker | Restores or adjusts surface color | Color loss and very fine scratches with little or no depression | No | Does not meaningfully rebuild a void |
| Mohawk Fil-Stik | Deposits prematched cosmetic fill | Shallow, stable nicks, nail holes, small gouges, and modest voids | No | Not established for structural repair or demanding wear |
| 3-in-1 repair tool | Combines marking, filling, and leveling functions | Small touch-ups where multiple functions are useful | Not identified as a heated system in the captured listing | Separate product; not interchangeable with Fil-Stik |
| Quick Fill Burn-In or similar heated filler | Places melt-in material into deeper cosmetic damage | Deeper scratches, chips, and selected surface defects | Yes, according to retailer guidance | Heat adds technique and finish-damage risk |
| Conventional wood putty | Provides a prematched small repair on finished wood | Small holes, dents, nicks, and similar defects | Usually no | Terminology and formulations vary; conventional putty is not generally treated as sandable or stainable |
| Hardening wood filler | Rebuilds material, often before finishing | Deeper defects in suitable bare or prepared wood | Usually no | May require sanding and finishing; compatibility with finished surfaces varies |
| Two-part epoxy or structural repair filler | Rebuilds missing material and may provide greater hardness or strength | Deep cracks, missing wood, damaged edges, or substantial voids | No heat, but mixing and curing are typical | Requires preparation and shaping; not appropriate for every structural condition |
Marker versus Fil-Stik
Choose a marker when the surface remains physically intact but has lost color. Choose Fil-Stik when there is a small depression that requires both material and color.
A marker applied inside a hole may darken the bottom without eliminating the shadow. Conversely, smearing filler over a color-only scratch may create unnecessary texture and sheen differences.
The Mohawk 3-in-1 product is separate
Mohawk also has separately listed tools combining marker, filler, and leveler functions. Home Depot identifies the Honey-colored model M319-3008B as a 3-in-1 repair tool marketed for cabinets, flooring, and furniture. The M319-3008B listing describes it as a marker, filler, and leveler; the captured page does not call it a Fil-Stik.
A multifunction format may be convenient, but it should not be treated as another name for standard Fil-Stik. Confirm the exact product, shade, included functions, and instructions.
Fil-Stik versus burn-in filler
Standard Fil-Stik is rubbed into a defect without heat. Quick Fill Burn-In and similar melt-in products are separate. Retailer guidance positions burn-in material for deeper cosmetic scratches and chips and describes it as requiring controlled low heat.
A heated filler may be appropriate for some deeper cosmetic damage, but it adds complexity. Follow the instructions and use the tools intended for the specific burn-in product; do not heat a standard Fil-Stik.
Putty versus hardening filler
As a broad category distinction, putty is commonly associated with small repairs in finished wood, while hardening filler is commonly associated with bare or prepared wood that may later be sanded and finished. The distinction is imperfect because manufacturers and retailers use “putty” and “filler” inconsistently.
Focus on documented behavior:
- Does the product remain pliable or cure hard?
- Can it be sanded?
- Is it intended for an already finished surface?
- Does it accept stain?
- Can it rebuild an exposed edge?
- Does it have meaningful adhesive or structural properties?
Do not infer these capabilities from the word “filler” alone.
When to investigate epoxy or another hard repair
A suitable two-part epoxy or hard filler is the category to investigate when a repair involves substantial missing material, deep cracks, exposed edges, or a need for greater hardness. Even then, filler is not a universal substitute for sound wood or correct joinery. Rot must be addressed, loose joints may need disassembly and regluing, and structural damage may require replacement or professional evaluation.
The practical selection rule is:
- Color-only defect: touch-up marker
- Shallow cosmetic void: Fil-Stik or comparable prematched putty
- Deeper cosmetic defect: suitable harder or heated filler
- Structural or missing-material repair: hard repair system, epoxy, wood replacement, or professional repair as conditions require
Pack Sizes, Dated Prices, Safety, and a Buying Checklist
Fil-Stik is listed as individual colors and in 12-, 24-, and 72-stick assortments. Catalog examples include Maple/Walnut, Light, Light Gray, Medium/Dark Gray, Standard, Furniture Store, and Flooring assortments, although the captured product table is incomplete and does not establish that every package remains current or in stock.
Which purchase format makes sense?
Buy one stick when you have one known finish, a well-supported shade choice, and only a few repairs. This minimizes cost and avoids accumulating colors you may never use.
Buy a color-family assortment when you maintain several related finishes or need neighboring shades for comparison. A maple/walnut or gray assortment may be more useful than repeatedly ordering individual colors that prove slightly wrong.
Buy a broad assortment mainly for repeat work, property maintenance, furniture repair, flooring work, or another setting where many unrelated finishes are encountered. Package size alone does not guarantee good value; consider how many included colors are likely to be useful.
One specialist retailer also listed custom color matching with a minimum order of 72 pieces per color. That quantity makes the service more relevant to trade, manufacturing, or repeat-volume applications than to a one-off household repair.
Price snapshots require current verification
The supplied seller pages showed individual-stick and assortment prices, but the evidence does not provide a reliable capture date for those figures. Exact historical prices are therefore omitted here rather than presented as dated market quotes.
Before buying, calculate the current effective cost:
Effective per-stick cost = (product price + tax + shipping − discounts) ÷ number of sticks
Price can change with seller, shade, quantity, stock, destination, and promotions. Package contents also matter: a lower per-stick price is poor value if most colors do not fit your work.
Check return terms before ordering, especially when screen images are the only color reference. Confirm whether opened sticks or assortments remain returnable.
Do not use marketplace star averages as proof that a shade will match or that a repair will last. Ratings can combine different variants, sellers, and user expectations. A retailer’s company-level service rating is also not a product-specific Fil-Stik performance review.
Safety information
One specialist retailer page displayed a California Proposition 65 warning alongside its Fil-Stik information. The captured material does not identify a chemical, exposure pathway, or exposure level, so it cannot establish the risk associated with a particular use.
Review the current product label and any available safety documentation before use. If the warning affects your decision and the current documentation is unclear, request clarification from the seller or manufacturer.
Pre-purchase checklist
Before ordering, verify:
- [ ] Exact color name
- [ ] Complete M230-, M231-, or other model number
- [ ] Whether the listing is actually Fil-Stik rather than a marker, repair pencil, 3-in-1 tool, or burn-in product
- [ ] Individual-stick or assortment quantity
- [ ] Current stock status
- [ ] Current price, shipping, tax, and discounts
- [ ] Return terms, especially after opening
- [ ] Intended surface and existing finish
- [ ] Whether the defect is cosmetic and stable
- [ ] Whether the location receives heavy handling or floor traffic
- [ ] Any finish or topcoat compatibility that remains unverified
- [ ] Current label and safety information
HFI Flooring presents this as an evidence-bounded informational guide, not as a claim of personal Fil-Stik testing or verified long-term performance. The publication describes its work as unsponsored and says it identifies the source when quoting a product, price, or specification in its editorial overview.
Frequently Asked Questions
Does a Mohawk Fil-Stik need to be heated?
No. Standard Fil-Stik listings instruct users to rub the material into a clean, dry defect and remove excess without heat or specialized tools.
Do not confuse standard Fil-Stik with Quick Fill Burn-In or other melt-in products. Those are separate repair systems intended for controlled heated application.
Can Mohawk Fil-Stik be used on a wood floor?
Retailer guidance includes wood-floor touch-ups among possible uses, but the available evidence does not establish compatibility with every wood species, factory finish, site-applied coating, or traffic level.
Use it cautiously for a small, stable cosmetic defect after checking the color and finish compatibility. A heavily trafficked path, moving gap, deep chip, or damaged board edge calls for a more durable or surface-specific repair.
Can Fil-Stik be sanded or stained after application?
Do not assume so. Conventional colored wax or putty-style material is generally chosen to match the existing finish rather than sanded and stained afterward.
If the repair must be shaped, sanded, or stained, investigate a hardening filler or another repair system whose current instructions explicitly support those steps.
Can a Fil-Stik repair be topcoated?
Specialist retailers say it may be protected with Tone Finish aerosol or another coating, but the available evidence does not establish compatibility with every lacquer, polyurethane, paint, or flooring finish.
Test adhesion, solvent interaction, color, and sheen on a concealed area or comparable finished sample before coating a prominent repair.
What Fil-Stik pack sizes are available?
Captured listings include individual sticks and 12-, 24-, and 72-stick assortments. Assortment examples include Maple/Walnut, Light, Light Gray, Medium/Dark Gray, Standard, Furniture Store, and Flooring.
Catalog coverage, package contents, stock, and pricing can change. Confirm the exact SKU and quantity before ordering.
The Bottom Line
Choose Fil-Stik when the defect is small, stable, cosmetic, and suited to a direct color match. Verify the exact shade and SKU, apply the standard product without heat, and level it with a clean, non-scratching tool.
For deep damage, broken edges, rot, loose joints, structural problems, or demanding wear locations, move to an appropriate harder repair system rather than expecting a cosmetic fill stick to perform structural work. Prices, availability, finish compatibility, topcoat behavior, and long-term durability should all be checked rather than assumed.