
What Hardwood Floor Refinishing Can Actually Change
See which scratches, stains, color shifts, and finish defects refinishing can change—and which moisture, movement, or structural problems it cannot fix.
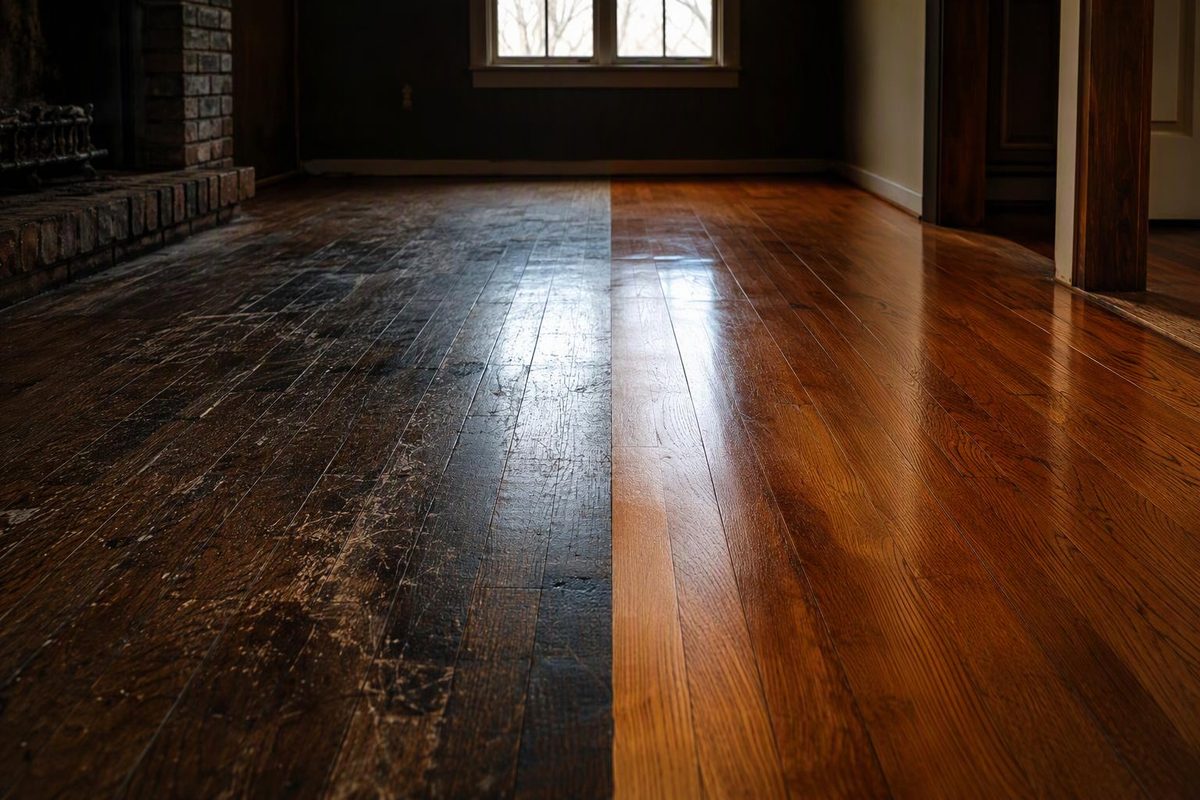
Full refinishing can remove worn finish, exposed gray wood and many shallow scratches while resetting the floor’s color and sheen. It cannot cure active moisture, stabilize loose boards, correct a sagging structure or guarantee removal of deep stains. A useful hardwood-floor before-and-after compares the original defect with what the selected treatment can reasonably achieve—not merely a dull room with a shinier one.
Choose the floor’s condition and whether damage is active; the tool will identify the appropriate next step.
Choose The Floor Condition
Select what is visible now. If several apply, choose the most serious condition.
Clean, Abrade And Recoat
Expect more-uniform sheen and renewed protection. Deep scratches, stains and wood damage will remain.
Compare All Conditions
| Before condition | Treatment | Realistic result |
|---|---|---|
| Dull, intact finish | Abrade and recoat | More-even sheen; deep defects remain |
| Bare wood or widespread scratches | Full sand and refinish | Finish, color and sheen reset |
| Isolated damaged boards | Repair or replace first | Damage reduced; board match may vary |
| Deep stains | Sand and assess | Marks may lighten but remain |
| Cupping or buckling | Correct moisture first | Refinishing postponed until stable |
| Moving gaps or boards | Diagnose movement | New finish will not stop movement |
| Slope, bounce or sag | Inspect framing and subfloor | No structural change from refinishing |
Source note: Treatment distinctions follow NWFA refinishing guidance and the conditions summarized in this article. NWFA says flooring with less than 3/32 inch (approximately 2.5 mm) of wear thickness generally should not be sanded.
The Existing Finish Determines Whether Sanding Is Necessary
Full refinishing removes the old coating and a small amount of wood, then adds stain if desired and a new protective finish. It is generally suited to widespread finish wear, exposed bare wood and scratches that extend beyond the coating.
The National Wood Flooring Association distinguishes a maintenance coat from a complete resand. It recommends full sanding and refinishing where there are deep scratches, dents, worn-away finish or exposed bare wood. A dull floor may need only a maintenance coat (NWFA).
If the existing coating remains intact and the damage consists mainly of fine scuffs or uneven sheen, cleaning, abrading and recoating may restore more-uniform sheen and protection. It will not remove defects that extend into the wood. Compare a screen and recoat before paying for full sanding.
A few split, broken or deeply stained boards may need localized repair or replacement before the surrounding floor is refinished. Replacement boards can remain distinguishable because age, grain and prior exposure affect the appearance of the original flooring.
Full Refinishing Reduces Wear Without Erasing Every Defect
Traffic Wear And Shallow Scratches Become Less Visible
Sanding removes the existing coating and can remove minor scratches and shallow dents in the wood (Bona). Traffic lanes, cloudy finish, patchy gloss and many chair scratches should become much less prominent.
Deep gouges require a different judgment. Removing enough wood to reach the bottom of every gouge may sacrifice too much flooring. A localized repair that remains slightly visible can be preferable to unnecessarily thinning the surrounding boards. Before approving the work, decide whether the priority is a flatter-looking surface or maximum preservation of the wear layer.
Deep pet or water stains may lighten during sanding but can remain if discoloration penetrates far into the wood. The realistic options are accepting the remaining mark, using a compatible stain strategy or replacing affected boards. The condition and construction of the floor determine which approach is practical.
Sanding Resets Color But Does Not Make Boards Identical
Sanding to bare wood removes the old stain and creates an opportunity to use a natural finish, change the color or adjust the undertone. It does not make every board uniform. Species, grain, sapwood, heartwood, previous contamination and replacement boards all affect stain absorption. DuraSeal’s gallery notes that natural wood tones vary and that final stain color can differ from board to board (DuraSeal).
Judge stain on the actual sanded floor rather than from a phone image or small retail swatch. The sample should cover several boards so that natural variation is visible. View it in daylight and artificial light with the intended topcoat. The hardwood-floor stain color guide explains how undertone, sheen and room light interact.
The Sheen Should Become Even Across The Floor
A successful after surface should not have abrupt glossy and dull zones in ordinary room lighting. Satin or matte may make everyday dust and small scratches less obvious than high gloss, but sheen cannot conceal sanding waves, edge marks, debris trapped in the finish or raised grain.
Use normal room lighting for the final visual assessment. A separate low-angle photograph is useful for documenting sanding waves and transitions near edges. Harsh light held directly against the floor can exaggerate texture that is not apparent during ordinary use, so it should supplement rather than replace the normal-light inspection.
Old Holes, Repairs And Moving Gaps May Remain
Nail holes, old repairs, deep dents, dark staining around fasteners and gaps may remain visible after refinishing. That does not automatically mean the work failed. The relevant question is whether those conditions were identified beforehand and included in the repair scope.
Do not assume every gap should be packed with rigid filler. Wood changes dimension with seasonal conditions, while rigid filler may crack or be pushed loose. The repair material must suit the gap’s size, location and movement. The hardwood-floor filler guide covers the distinctions among common repair materials.
Active Moisture Or Movement Must Be Corrected First
Postpone sanding when boards are cupped, buckled, soft, loose or newly water-damaged. Locate and correct the water source, then verify that the flooring and supporting materials have stabilized. A board can feel dry at the surface while moisture remains below it.
Cupping, crowning and buckling are not finish defects. Large seasonal gaps or moving boards can also indicate humidity, fastening or substrate conditions that a new coating will not correct. A sloped, bouncing or sagging floor calls for inspection of the subfloor and framing rather than cosmetic refinishing.
The decision sequence in dry, refinish or replace water-damaged hardwood helps distinguish coating damage from problems involving the boards or subfloor.
The Remaining Wear Layer Can Rule Out Sanding
Confirm that the floor can safely lose more wood before approving a full resand. Fasteners in solid strip flooring may be close to the surface after previous sanding. Engineered flooring has a real-wood wear layer with limited thickness.
NWFA guidance says that, in general, flooring with less than 3/32 inch—approximately 2.5 mm—of wear thickness should not be sanded (NWFA). This general threshold does not establish the condition of a particular floor. Product records, a removed vent or threshold, and inspection by an experienced flooring professional can help identify the construction and remaining wear layer.
If the construction or usable thickness is unknown, the before-and-after plan should not assume that full sanding is available. Screening and recoating, localized repairs or replacement may be more appropriate after inspection.
Comparable Photos Show What The Work Actually Changed
Take the before and after photographs from the same marked positions. Keep the camera height, direction, curtains, lamps, overhead lights and lens setting consistent. Photograph both surfaces dry and clean, and use the same time of day where practical.
Record three complementary views:
- Whole-room view: Shows the overall color and sheen.
- Low-angle view across the boards: Reveals sanding waves, edge transitions and finish uniformity.
- Close defect view: Documents the scratch, stain, patch or replacement board discussed in the estimate.
Photograph thresholds, perimeter edges, radiator pipes, floor vents, stairs and transitions separately. These areas commonly cause scope disagreements and are difficult to assess in a broad room image.
Do not compare a dim, cluttered before photo with a brightly lit, wide-angle after photo. That comparison may show how the room was staged, but it does not reliably demonstrate whether a stain disappeared, an edge was blended or the sheen became uniform.
The Work Order Should Define The Expected After Condition
The estimate or work order should identify:
- the rooms, closets, stairs and thresholds included;
- full sanding versus a maintenance recoat;
- boards scheduled for repair or replacement;
- whether gaps, holes and dents will be filled;
- the stain manufacturer, color or approved custom mixture;
- the sealer, finish system, sheen and number of coats;
- treatment of base shoe, doors, vents and transitions;
- dust-containment and cleanup responsibilities; and
- walk-on, furniture, pet and area-rug timing for the exact finish used.
Do not apply one manufacturer’s cure schedule to another product. As one system-specific example, Bona says stocking feet may be allowed after three to four hours, furniture may be placed—not dragged—after 48 hours, and area rugs may return after one week. Bona also notes that temperature and relative humidity affect drying (Bona). Follow the installed finish’s label and the written project instructions for the actual schedule.
For budgeting, separate the base sanding-and-finishing price from board repairs, stairs, furniture handling and color upgrades. The hardwood refinishing cost guide explains why two similar-looking before photos can produce different estimates.