
How to Build a Sound, Moisture-Protected Bathroom Floor
Properly rated plywood or OSB can work, but neither is waterproof; DITRA examples show how joist spacing and tile type change the required layers.
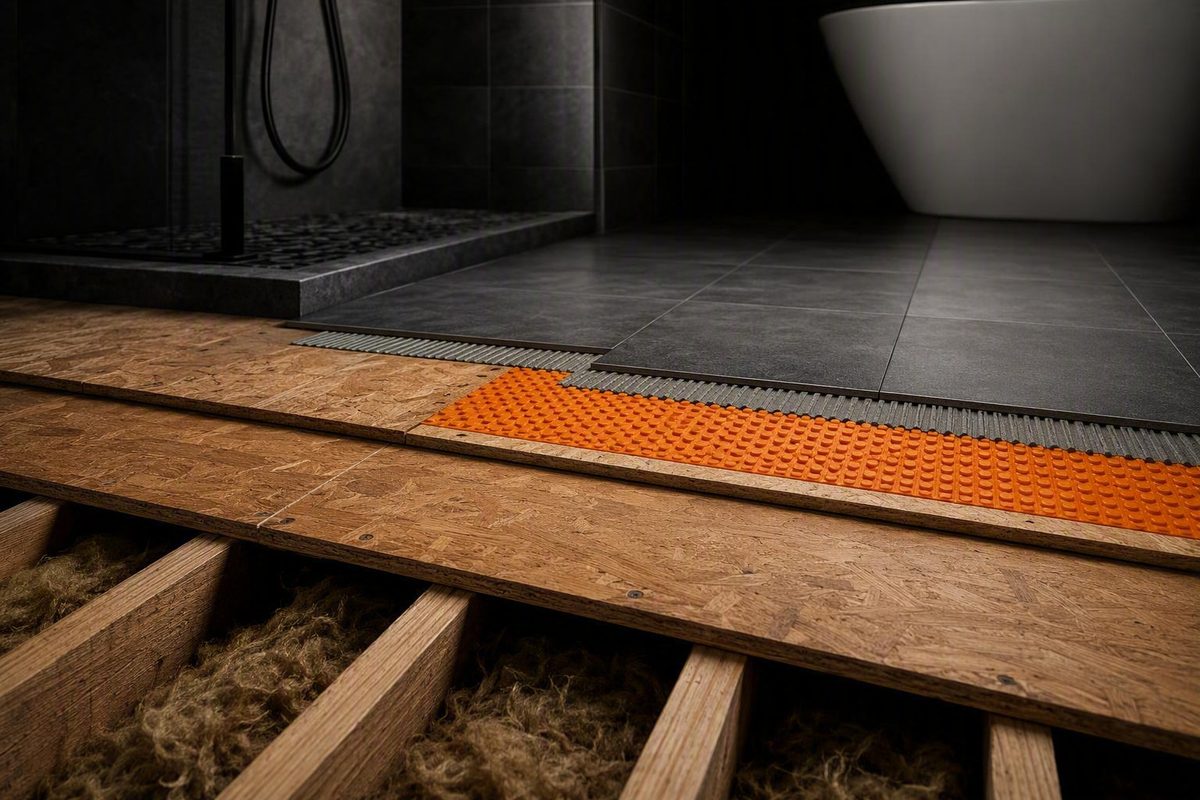
A suitable subfloor for a bathroom can be properly rated plywood or OSB; neither material is inherently waterproof. Choose the complete floor assembly by checking for water damage, identifying the joist spacing and condition, selecting the finish flooring, and following the current instructions for that exact underlayment and flooring system. There is no universal 5/8-inch or 3/4-inch minimum for every bathroom because product requirements vary with framing, finish material and assembly design, as illustrated by the Schluter DITRA installation handbook.
The short answer: choose the whole floor assembly, not just a panel
A bathroom floor has to work as a system. The joists support the floor, the structural panel spans the joists, an underlayment prepares or isolates the finish, and a separately detailed water-control layer protects moisture-sensitive materials.
Use this four-step decision path:
- Inspect the existing floor. Look for leaks, softness, swelling, rot, delamination, sagging and movement.
- Identify the framing. Determine the joist or truss type, spacing, unsupported span and condition.
- Choose the finish. Ceramic or porcelain tile, natural stone and non-tile flooring can impose different substrate requirements.
- Select a complete system. Follow the current panel, underlayment, membrane and finish-floor instructions as one coordinated specification.
Properly rated plywood and OSB are both established structural-panel options. Suitability depends on the panel grade, span rating, thickness, orientation and support spacing—not simply whether the sheet is labeled OSB or plywood.
That is why “always use 3/4-inch plywood” is not a complete specification. Panel rating and edge support matter, but so do joist spacing and stiffness, fastening, finish material, underlayment requirements and applicable local requirements. A thicker sheet cannot automatically compensate for damaged framing or an unsuitable installation system.
The numerical examples below apply specifically to cited Schluter DITRA-family tile assemblies. Do not transfer those dimensions to another membrane, backer board, liquid-applied product or non-tile floor without checking that system’s current instructions.
Check the existing floor before choosing new materials
Do not cover a bathroom floor that is soft, swollen, rotten, delaminated, sagging or breaking around a tub, shower or toilet. These conditions require investigation rather than another sheet or membrane placed over them.
First, locate and correct the source of the water. Potential leak zones include the toilet connection, tub or shower edge, drain, supply or waste plumbing, and poorly detailed transitions. Leaving an active leak beneath a new finish exposes the replacement assembly to the same failure mechanism.
If the floor is sagging or unstable, keep people and loads off it and have safe access assessed first. Have enough of the affected area exposed to determine the condition of both the structural panel and the framing without cutting into concealed services. For the cited DITRA systems, the substrate must be even, load-bearing, structurally sound and suitable for bonding before membrane installation. The panels must also be properly fastened, and leveling must occur before the membrane is installed. These substrate prerequisites are set out in Schluter’s DITRA product guidance.
Do not determine a repair solely from the visible size of a stain. The required replacement area, edge support and framing work depend on where the supports run, how the panel edges are supported and how far the deterioration extends. Without those details, a generic patch size or fastening schedule would be unreliable.
If joist damage is visible, or if you cannot establish that the floor remains structurally sound and load-bearing, pause installation and obtain qualified local guidance. A membrane, backer board or additional panel cannot establish the adequacy of uncertain framing.
Know what each bathroom-floor layer actually does
Confusing structure with waterproofing is a common source of poor floor design. Each layer has a different job.
| Layer | Primary function | What it cannot fix |
|---|---|---|
| Joists or floor trusses | Carry floor loads and support the panel system | Rot, unsuitable spans or damaging alterations without an appropriate structural repair |
| Plywood or OSB subfloor | Spans the framing and forms the structural panel deck | Ongoing leaks or inadequate framing stiffness |
| Optional second wood layer | Satisfies assembly-specific requirements, including some natural-stone and wide-spacing applications | Rotten first-layer panels, weak joists or unsupported framing |
| Cement backer or tile underlayment | Provides a surface compatible with the selected tile system | Structural decay, unsupported seams or excessive floor movement |
| Uncoupling membrane | Reduces the transfer of differential movement into tile | Inadequate framing, damaged panels or poor fastening |
| Detailed waterproofing layer | Controls water at specified seams, transitions and penetrations | Active plumbing leaks or incomplete shower and drain construction |
| Finish flooring | Provides the wear surface and finished appearance | Missing structural support or incomplete wet-area detailing |
Schluter describes DITRA-family products as tile underlayments providing manufacturer-claimed uncoupling, waterproofing, vapor management and load distribution. They are installed over a load-bearing substrate; they are not structural subfloors.
Likewise, cement backer board or an uncoupling membrane cannot repair weak joists, rotten panels, unsupported seams or excessive movement. Such products can be parts of a suitable tile assembly only after the structure is sound.
The finish flooring is not the bathroom’s entire water-control system. A water-resistant main floor does not replace a properly detailed shower receptor, drain, wall system, tub connection, toilet connection or plumbing installation.
How to read a plywood or OSB panel stamp
Do not select a panel by thickness and material name alone. Check the grade stamp or certification mark for the information connecting the panel to its intended structural use.
Use this purchase checklist:
- Panel grade: Verify that the panel is identified for a structural flooring or sheathing application accepted by the selected assembly.
- Applicable standard: Look for the standard under which the panel was manufactured and evaluated, such as PS 1, PS 2 or another applicable performance standard.
- Span rating: Match the marked rating to the actual support spacing and intended use.
- Thickness or Performance Category: Confirm the panel marking instead of relying only on a shelf label.
- Bond classification: Determine whether the panel is marked Exposure 1 or Exterior.
- Edge profile: Buy tongue-and-groove panels where the selected assembly requires them.
- Strength-axis orientation: Confirm that the panel can be installed with its strength axis across the supports.
On a two-number APA span rating, the right-hand number is the recommended maximum support spacing in inches for subfloor use when the panel’s long dimension or strength axis runs across the supports. Certain floor-panel grades use a single-number rating. The APA guide to panel stamps explains these ratings, applicable standards, Performance Categories and bond classifications.
Tongue-and-groove edges can provide panel-edge support in qualifying applications and may eliminate the need for blocking beneath those edges. That does not mean blocking is never needed: cut edges, damaged edges, panel layout and the selected assembly can create different support requirements.
Exposure 1 and Exterior are bond classifications, not promises that the panel is waterproof. Exposure 1 is intended to tolerate temporary construction-type moisture effects. Exterior-rated panel bonds are intended for more severe or prolonged exposure, but an Exterior marking still does not turn a structural panel into the bathroom’s finished water-control layer or make an ongoing leak acceptable.
Worked example: subfloor thickness for a DITRA tile assembly
This is a Schluter DITRA-family example, not a universal bathroom-subfloor chart. The following requirements and nominal conversions apply to qualifying, structurally sound wood floors. The cited details also generally require tile at least 2 by 2 inches; smaller tile needs separate product guidance. Verify the exact product detail in the cited DITRA handbook.
| Finish, framing and product | Cited wood-floor requirement |
|---|---|
| Ceramic or porcelain over framing no more than 16 inches on center, using standard DITRA | One 19/32-inch panel, commonly called nominal 5/8-inch tongue-and-groove plywood or OSB |
| Ceramic or porcelain over framing no more than 19.2 inches on center, using standard DITRA | One 23/32-inch panel, commonly called nominal 3/4-inch tongue-and-groove plywood or OSB |
| Ceramic or porcelain over I-joists or floor trusses at 24 inches on center, using standard DITRA | Nominal 3/4-inch subfloor plus at least nominal 3/8-inch underlayment |
| Ceramic or porcelain over I-joists or floor trusses at 24 inches on center, using DITRA-XL | A qualifying single nominal 3/4-inch tongue-and-groove plywood or OSB layer |
| Natural stone over framing no more than 24 inches on center | Double-layer plywood or OSB floor, regardless of joist spacing; follow the exact product detail |
These dimensions do not prove that an existing floor is structurally adequate. Panel thickness alone does not verify joist size, span, stiffness, condition, fastening, structural deflection or compliance with applicable local requirements.
Natural stone should not be evaluated using the ceramic or porcelain minimums. In the cited assemblies, it requires a double-layer wood floor regardless of joist spacing, with framing no more than 24 inches on center.
Product names also matter. DITRA, DITRA-XL and DITRA-HEAT do not have interchangeable requirements. Select the exact system first, then use its current detail rather than assuming that every membrane in the same product family permits the same wood-floor construction.
Make the assembly water-resistant where it matters
The structural wood should remain dry, but it is not the layer to depend on for repeated wetting. Water control belongs above moisture-sensitive plywood or OSB, using compatible components and properly treated seams, boundaries and penetrations.
Laying a DITRA-family membrane across the field of the floor does not by itself complete a waterproof assembly. For the cited systems, membrane seams and floor-to-wall transitions must be sealed with the specified KERDI-BAND and compatible mortar. Schluter calls for at least a 2-inch overlap in these waterproofing details; follow the exact installation method in the manufacturer’s DITRA guidance.
Plan water control by connection and penetration rather than assuming one uninterrupted field membrane solves every detail. Review:
- floor-to-wall transitions;
- the shower entrance and receptor;
- drain integration;
- tub-to-floor and tub-to-wall connections;
- toilet and pipe penetrations;
- door thresholds; and
- transitions to adjoining floors.
A waterproofed main floor does not automatically waterproof any of those components. In particular, it does not replace the specified shower tray or receptor, slope, drain connection, wall waterproofing or plumbing work.
Waterproofing also does not eliminate movement accommodation. DITRA-family tile assemblies still require perimeter and other specified movement joints. Do not fill intended movement spaces simply because the floor is in a wet room.
Account for finished height before installation. A second wood layer, underlayment, membrane, mortar and tile can affect thresholds, adjoining flooring, door clearance and fixture elevations. Curbless-shower layouts are especially sensitive to total buildup, slope and drain geometry.
Preinstallation decision checklist
Before covering the floor, verify each item:
- [ ] There is no active leak. The source of previous wetting has been found and corrected.
- [ ] No compromised wood remains. The panel is not soft, rotten, swollen, broken or delaminated.
- [ ] The framing is understood. Joist or truss type, spacing, span and condition have been identified.
- [ ] Structural concerns are resolved. There is no unexplained sag, excessive movement or uncertain joist damage.
- [ ] The panel stamp has been checked. Grade, standard, span rating, thickness or Performance Category, and bond classification suit the application.
- [ ] Panel orientation is correct. The strength axis runs as required relative to the supports.
- [ ] Edges are supported as required. Tongue-and-groove joints, blocking and cut-panel edges match the chosen assembly.
- [ ] Panels are properly fastened. Loose or moving sheets have been corrected under the applicable panel and system instructions.
- [ ] The surface is even and load-bearing. Flattening or leveling will occur at the stage required by the selected system.
- [ ] Problem seams are corrected. Tightly butted or tented joints will not be buried beneath the underlayment.
- [ ] The finish is confirmed. Ceramic or porcelain, natural stone and small-format tile have been checked against their distinct requirements.
- [ ] The full buildup is known. Include every wood layer, underlayment, membrane, heating layer where applicable, mortar and finish.
- [ ] Finished-height effects are resolved. Check thresholds, adjoining floors, doors and fixture elevations.
- [ ] Waterproofing details are complete. Include seams, wall transitions, penetrations and boundaries.
- [ ] Movement joints are planned. Include required perimeter and field accommodation.
- [ ] Current instructions agree. Reconcile the panel, underlayment, membrane, flooring and applicable local requirements before installation.
For the cited Schluter wood-floor assemblies, the manufacturer recommends Exposure 1 panels and 1/8-inch gaps between sheets, while also requiring tightly butted or tented seams to be corrected. These requirements are product-specific, so confirm them in the handbook for the exact membrane rather than applying the spacing rule automatically to another system.