
How to Choose, Inspect, and Repair the Structure Beneath Your Floor
Identify the floor layers, diagnose the cause, select a rated assembly for its supports and finish, then verify moisture and structural soundness.
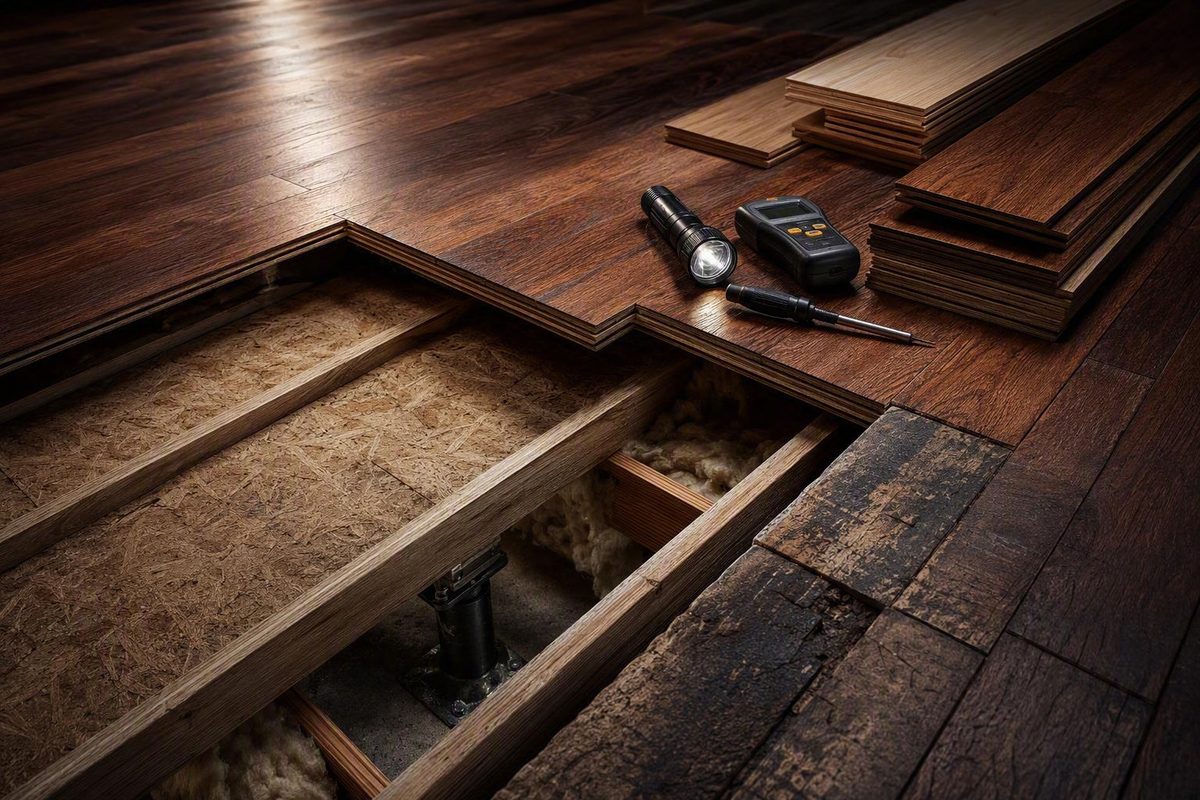
Editorial scope: This guide provides general educational information. Panel specifications, structural repairs, moisture decisions, environmental testing, permits, and finished-floor requirements must be confirmed for the particular building, product system, and jurisdiction.
What a wooden subfloor is—and what it is not
A typical framed floor is built in layers:
- Joists or other framing carry the floor assembly and transfer loads to beams, walls, posts, and foundations.
- The structural subfloor spans the framing, distributes loads, and creates a continuous working surface.
- Optional underlayment provides the smoothness or compatibility required by a particular finished floor.
- Finished flooring—such as hardwood, carpet, vinyl, or tile—forms the visible surface.
The wooden subfloor is therefore not simply “whatever is beneath the flooring.” It is the structural wood layer supported by the framing. In modern construction, that layer is usually plywood or oriented strand board (OSB). Older homes may have individual boards or planks fastened across the joists.
Underlayment has a different job. It does not restore strength to rotten wood, compensate for damaged joists, support an improperly detailed panel edge, or stop excessive floor movement.
Not every floor contains all four layers. Some combination panels can perform as both structural subfloor and underlayment in qualifying assemblies. APA distinguishes Rated Sturd-I-Floor, Rated Sheathing, and separate plywood underlayment. The correct arrangement depends on the panel rating, support spacing, installation method, and finished flooring.
This distinction matters during diagnosis. A squeak heard at the surface might come from a hardwood board, underlayment joint, loose subfloor fastener, unsupported panel edge, or moving joist. A hump could be a swollen panel seam, uneven patch, high joist, or finish-floor problem.
Start by identifying the layers that actually exist. Then trace the symptom through the complete assembly instead of assuming that every visible flooring defect means the wooden subfloor has failed.
Plywood, OSB, plank floors, and rated panel systems
The three principal wooden subfloor systems are solid-wood planks, plywood panels, and OSB panels.
Traditional plank subfloors
Older plank subfloors consist of individual boards fastened across the joists. Gaps, irregular board thicknesses, loosened fasteners, splits, and accumulated repairs can make these floors less uniform than modern panel systems.
A plank floor does not automatically need to be removed. Sound, dry, secure, adequately supported boards can sometimes remain beneath new flooring. Loose, split, or deteriorated boards should be repaired first, however, and an uneven surface may need an appropriate structural or underlayment overlay selected for the intended finish.
An overlay should not be treated as a universal remedy. Its suitability depends on the condition and support of the planks, the structural requirements of the floor, the added height, and the finished-floor installation instructions.
Plywood
Plywood is assembled from thin wood veneers, with the grain direction rotated between layers. This cross-laminated construction reduces the strongly directional behavior associated with a single solid board.
Subfloor plywood is available in different grades, thicknesses, edge profiles, span ratings, and exposure classifications. The word plywood alone does not establish that a sheet is suitable for a particular floor.
Oriented strand board
OSB is made from oriented layers of bonded and pressed wood strands. Like plywood, it is sold in structural grades and configurations intended for different applications.
Properly rated OSB and plywood can both serve as structural subfloor panels. Neither is universally superior. Selection should reflect the panel stamp, framing, expected exposure, installation requirements, and flooring above it.
| Characteristic | Plywood tendency | OSB tendency | Why the comparison needs qualification |
|---|---|---|---|
| Composition | Cross-laminated wood veneers | Oriented layers of bonded wood strands | Manufacturing and grade vary |
| Price positioning | Commonly higher | Commonly lower | Regional supply and product grade affect price |
| Weight | Commonly lighter | Commonly heavier and denser | Sheet thickness and product design matter |
| Uniformity | Veneers can contain localized natural variation | Often described as more uniform across a panel | Neither description replaces the structural rating |
| Drying after wetting | Commonly dries faster | Commonly dries more slowly | Exposure duration and ventilation strongly affect drying |
| Characteristic moisture damage | Veneer separation or delamination can occur | Edge swelling can remain after drying | Either material can become unserviceable after damaging exposure |
These are tendencies, not guarantees. Comparative sources commonly characterize OSB as less expensive and heavier, and plywood as faster-drying. They also identify different moisture-related failure patterns: plywood can delaminate, whereas OSB may retain swollen edges after wetting. Product grade, exposure, installation, and local conditions can outweigh the broad comparison, as summarized in this plywood-and-OSB overview.
Rated panel systems
Two labels are especially useful when planning the assembly:
- APA Rated Sturd-I-Floor is a plywood or OSB combination subfloor-underlayment panel intended for qualifying single-layer floor assemblies. Carpet and pad are a prominent use case.
- APA Rated Sheathing is a general structural panel for roof, wall, or subfloor applications. When used as a subfloor, it may need separate underlayment for the selected finish.
Enhanced moisture-resistant plywood and OSB products form another category. Coatings, resins, edge treatments, or drainage details may improve documented exposure performance, but the label enhanced does not establish zero swelling, guarantee a squeak-free floor, or make a panel suitable for chronic wetting.
The useful purchasing question is not “Plywood or OSB?” in isolation. It is: Which rated panel assembly fits the support spacing, expected exposure, loads, edge-support method, installation instructions, and finished floor?
How to select the correct panel rating, thickness, and edge profile
There is no evidence-supported universal thickness for every wooden subfloor.
A panel that works over closely spaced supports under one finish may be unsuitable over wider spacing, under a concentrated load, or beneath a finish with stricter stiffness requirements. Selection depends on:
- joist or support spacing;
- the panel span rating;
- anticipated loads;
- panel orientation;
- support at edges and ends;
- the finish-floor system;
- applicable building requirements;
- panel-manufacturer instructions; and
- flooring-manufacturer instructions.
Read the span rating
A span rating communicates the maximum recommended center-to-center support spacing for the rated application. It is not a general promise that the panel will work in every assembly up to that spacing regardless of load, orientation, edge treatment, or finished floor.
On APA Rated Sheathing, a two-number rating has different meanings for roof and floor uses. In examples such as 24/16 or 48/24, the second number applies to subfloor support spacing. Those numbers illustrate how the stamp is read; they are not universal recommendations for a particular house or repair. APA also presents Sturd-I-Floor ratings specifically for floor support spacing in its panel-system guidance.
Always read the complete grade stamp and accompanying product literature rather than extracting one number from the panel.
Nominal thickness is not measured thickness
Panel labels commonly use nominal dimensions, and the actual measured thickness can differ. For example, one nominal 23/32-inch tongue-and-groove OSB subfloor panel was listed as 0.703 inch thick when accessed on September 7, 2026, in the retailer’s identified product listing.
That difference matters when patching. A replacement chosen only by its nominal label may sit high or low relative to the existing floor. Before buying material:
- Measure the existing panel in an undamaged area.
- Identify its edge profile.
- Look for a grade stamp or other rating information.
- Confirm support spacing.
- Check whether swelling, sanding, coatings, or overlays distort the measurement.
- Select a replacement that meets the structural requirements and permits a flat transition.
Do not solve a meaningful thickness mismatch merely by forcing the patch into place. The boundary must remain supported, securely connected, and compatible with the finished flooring.
Tongue-and-groove versus square edge
Tongue-and-groove panels interlock along their long edges. In a rated system that permits it, this can support adjoining long edges between joists and eliminate separate long-edge blocking.
That does not mean tongue-and-groove panels need no boundary support. Blocking or another designed support detail may also be required by the product instructions, repair geometry, or structural design.
Square-edge panel joints that fall between joists need an approved form of edge support.
Understand exposure classifications conservatively
Retail listings include panels classified as Exposure 1 and others classified as Exterior. Those names should not be interpreted in isolation. They do not establish that a panel is waterproof, flood-resistant, or suitable for repeated leaks and chronic humidity. Verify the complete classification, permitted application, and manufacturer instructions for the selected product.
Compact purchasing checklist
Before ordering a panel, confirm:
- [ ] Intended and rated subfloor use
- [ ] Complete grade stamp
- [ ] Span rating
- [ ] Measured thickness, not just nominal thickness
- [ ] Tongue-and-groove or square-edge profile
- [ ] Exposure classification and its documented limits
- [ ] Actual support spacing
- [ ] Required panel orientation
- [ ] Edge- and end-support method
- [ ] Finished-floor manufacturer’s substrate instructions
- [ ] Applicable code, permit, and inspection requirements
Installation principles that control stiffness, movement, and flatness
A universal fastening schedule would be misleading. Fastener type, diameter, length, spacing, adhesive, joint gaps, and perimeter details must come from the selected panel system, structural design, and applicable code.
Several principles nevertheless apply across many wooden subfloor installations and repairs.
Support every required boundary
Panel edges and ends must receive the support required by the rated system. Depending on the repair, support may come from existing joists, added blocking, or another project-specific framing detail approved for the assembly.
Do not assume that the remaining old panel can carry a new patch edge merely because the pieces touch.
Before cutting, locate joists, pipes, wiring, ducts, fasteners, and other concealed elements. Plan the opening so compromised material can be removed while leaving a boundary that can be supported safely.
Lay out panels to avoid concentrated joints
Stagger panel joints rather than aligning adjacent rows. Avoid intersections where four panel corners meet.
Panel orientation also matters. Do not copy the orientation of an unexplained old repair without checking the selected panel’s instructions.
Treat flatness as an assembly requirement
Nominal thickness is only one part of a successful transition. Also check:
- whether old material is swollen or delaminated;
- whether joist tops are aligned and sound;
- whether debris or hardened adhesive prevents full framing contact;
- whether new blocking sits flush;
- whether the panel edge profile engages correctly; and
- whether the final surface meets the finish manufacturer’s flatness limits.
A panel of the “right” labeled thickness can still form a hump if it bridges hardened adhesive or a high joist. It can sit low if the old panel has an overlay or if the framing beneath the patch has deteriorated.
Use the specified joint gaps
Some installation and repair guides use 1/8 inch as a panel-spacing example. LP Building Solutions, for instance, specifies a 1/8-inch gap between old and new panels in its water-damage repair guidance. That figure should not be converted into a universal rule for every panel edge, patch, or perimeter; the product-specific repair and installation instructions govern.
Instructions may distinguish among supported ends, tongue-and-groove edges, walls, and other obstructions.
Adhesive is a system component, not a cure-all
Adhesive plus mechanical fasteners can be part of an approved installation. APA says its glued Sturd-I-Floor system can increase stiffness and reduce movement-related squeaks and nail popping. That is a system-specific performance claim—not a guarantee that any adhesive application will silence a floor.
It also does not excuse using the wrong fastener or ignoring required framing contact.
High-level sequence for partial replacement
- Expose the affected area. Remove enough finish and underlayment to understand the defect rather than cutting only around the visible stain.
- Find the cause and extent. Identify moisture, movement, inadequate support, or impact damage and locate sound panel and framing.
- Plan the boundaries. Determine where cuts can be made while protecting utilities and creating support for every required patch edge.
- Remove compromised material. Avoid unnecessary damage to joists and adjacent sound panels.
- Inspect and establish support. Repair or escalate framing defects before installing the patch.
- Match the replacement. Confirm rating, measured thickness, edge treatment, orientation, and compatibility.
- Install to the specified system. Follow the panel instructions for spacing, adhesive if approved, and mechanical fastening.
- Verify the transition. Check support, movement, height, flatness, moisture condition, and readiness for the next flooring layer.
Never use an overlay to conceal an active leak, soft framing, rot, or excessive movement. An overlay can improve a suitable surface; it cannot turn a failing structure into a sound one.
Matching the subfloor assembly to the finished flooring
Whether flooring can be installed directly over a wooden subfloor depends on four things: the panel’s rating, the surface condition, the flooring installation method, and the instructions for the complete finish-floor system.
Carpet and pad
An appropriate Sturd-I-Floor panel can function as a combined subfloor and underlayment beneath carpet and pad, so a separate underlayment may not be required. Fully adhered carpet presents different surface demands and may call for underlayment.
Hardwood
APA describes underlayment as optional over Rated Sheathing or Sturd-I-Floor beneath hardwood. “Optional” does not mean irrelevant: the hardwood manufacturer may require a particular substrate, thickness, fastener-holding condition, moisture range, or surface preparation.
Old plank subfloors may sometimes remain beneath hardwood when the boards are dry, sound, secure, adequately supported, and sufficiently flat for the installation method. Repair loose or split boards first. Where an overlay is needed, select it as part of the structural and finish-floor assembly rather than as a cosmetic cover.
Sheet vinyl and vinyl tile
Thin resilient flooring tends to reveal joints, texture, fasteners, and small surface defects. APA explicitly recommends a smooth plywood underlayment beneath sheet vinyl and vinyl tile rather than direct installation over ordinary structural sheathing.
Surface preparation is still required after installing underlayment. The underlayment must be compatible with the vinyl and adhesive system, and its joints and fasteners must be treated as directed by the flooring manufacturer.
Ceramic tile
Tile requires a sufficiently stiff, stable, and compatible substrate system. An additional underlayment or tile-system layer may be required. The available evidence does not support one universal backer board, membrane, thickness, or rule excluding all OSB.
Use the requirements of the selected tile, mortar, underlayment or membrane, panel system, and applicable code. Cracked tile or grout may indicate movement, but adding a tile-system layer over a moving floor does not correct the underlying deflection.
Block parquet
The Solid Wood Flooring Company specifies 18 mm marine-grade plywood beneath its block parquet. That is product-specific guidance from one flooring company, not a universal North American specification. It illustrates why the requirements for the selected parquet product must be checked before preparing the substrate.
What underlayment can—and cannot—do
Underlayment can provide:
- a smoother surface;
- a more compatible bonding face;
- separation from panel joints or texture;
- resistance to localized indentation, depending on the product; or
- a specified component in a tile or resilient-floor assembly.
It cannot correct:
- rot or delamination;
- inadequate joist support;
- damaged framing;
- unsupported structural joints;
- excessive deflection;
- active water entry; or
- significant panel movement.
Finish-floor readiness checklist
Before covering a wooden subfloor, verify:
- [ ] Moisture sources have been corrected
- [ ] The subfloor and framing are dry to the applicable system requirements
- [ ] Panels or planks are structurally sound
- [ ] Fastening is secure
- [ ] Required edges and ends are supported
- [ ] Patch transitions are flat
- [ ] The surface is clean and free of incompatible residues
- [ ] Protruding fasteners and damaged seams have been corrected
- [ ] Flatness and deflection meet the finished-floor limits
- [ ] The underlayment, adhesive, membrane, or fastening method is approved for the complete assembly
What squeaks, soft spots, bounce, and sagging may mean
Symptoms guide an inspection, but they do not prove a diagnosis. More than one defect can produce the same sensation at the finish floor.
| Symptom | Possible causes—not proof |
|---|---|
| Localized or shifting squeak | Loose fastener, panel-to-joist gap, unsupported edge, humidity-related movement, moving joist, or finish-floor movement |
| Soft or spongy spot | Moisture deterioration, rot, insufficient panel thickness or support, age-related damage, insect damage, or an unsupported patch |
| General bounce | Inadequate stiffness, long framing span, weak panel, inadequate joist support, loose connections, or framing damage |
| Localized or growing sag | Damaged panel, damaged or over-spanned joist, failing beam or support, rot, or prolonged moisture exposure |
| Raised seam or hump | Swollen panel edge, high joist, debris beneath a patch, misaligned blocking, or poor transition |
| Dip or unevenness | Low joist, panel deterioration, unsupported joint, thin patch, framing settlement, or installation defect |
| Stain or musty odor | Current or previous moisture, concealed leakage, crawl-space humidity, or microbial growth elsewhere in the assembly |
| Buckled or warped finish | Moisture, restricted movement, adhesive failure, or movement beneath the finish |
| Cracked tile or grout | Substrate movement, inadequate stiffness, installation defect, impact, or another tile-system problem |
Flooring service guidance commonly associates persistent squeaks with loose fasteners, gaps, humidity-related wood movement, and installation defects. Soft or bouncy areas may be associated with moisture, inadequate support, deterioration, age, or insects. These are useful leads rather than conclusive findings, as this symptom overview from Floorz illustrates.
A non-destructive first pass
- Map the symptom. Mark where the noise, softness, slope, or movement begins and ends. Note whether it changes with foot position.
- Walk cautiously. Avoid repeatedly loading a visibly failing or severely soft area.
- Look from below when access is reasonably safe. From a basement or accessible crawl space, look for staining, active drips, damaged panel edges, separated layers, visible growth, cut joists, loose supports, and improvised repairs.
- Relate the pattern to framing. A line of squeaks may follow one joist. A soft rectangle may outline an old patch. Damage around a toilet, tub, exterior door, dishwasher, or refrigerator may suggest a water source.
- Check adjoining rooms and levels. Water can travel before becoming visible.
- Document changes. Photographs, dates, and repeat measurements can help establish whether a sag or stain is stable or growing.
As a conservative precaution, do not enter a crawl space when standing water, exposed or questionable electrical conditions, sewage, unstable supports, pests, or inadequate clearance make access uncertain. Severe softness, a growing sag, extensive decay, damaged joists, or uncertainty about load capacity should end a casual homeowner investigation.
For related coverage of causes, jacking, sistering, and permanent support, see HFI Flooring’s guide to diagnosing a sagging floor over a crawl space. Panel repair should not proceed as if it were independent of the framing beneath it.
Water damage: when drying may work and when replacement is more likely
The governing rule is simple: repair the leak, drainage defect, appliance problem, or humidity source before restoring or covering the floor. Otherwise, a technically competent patch may become the next damaged area.
Assess in the right order
- Expose the affected assembly. Water can remain beneath flooring that looks dry at the surface.
- Identify the source. Determine whether it is plumbing, an appliance, roof entry, exterior drainage, flooding, sewage, condensation, or crawl-space or basement humidity.
- Determine the type of water and associated hazards. Clean-water exposure presents a different restoration problem from sewage or other contamination.
- Map the affected area. Follow moisture beyond the obvious stain.
- Measure retained moisture directly. A moisture meter can detect water remaining in wood even when the surface appears dry.
- Inspect the panels. Check for firmness, swelling, distortion, delamination, loss of fastener holding, rot, and visible mold.
- Inspect joists and supports. Determine whether deterioration stops at the panel or continues into structural framing.
- Determine the extent. Decide whether the problem is limited, widespread, actively changing, or structurally uncertain.
Commercial flooring restoration guidance notes that moisture meters can identify retained water beneath an apparently dry surface. See the discussion of concealed subfloor moisture and inspection.
When drying may be reasonable
Drying rather than immediate replacement may be considered when:
- the exposure was relatively limited;
- the water was not contaminated;
- the source has been stopped;
- the panel remains firm and structurally sound;
- there is no consequential delamination, rot, warping, or persistent swelling;
- framing and connections remain sound; and
- drying can be verified before the assembly is enclosed.
These are assessment factors, not a universal pass-or-fail formula. Commercial restoration guidance similarly treats contamination, exposure duration, retained moisture, structural condition, mold, and rot as relevant to the decision between drying and replacement. Its water-damaged subfloor overview also describes moisture meters and thermal imaging as mapping tools rather than substitutes for an on-site condition assessment.
When replacement or professional assessment is more likely
Escalate the project when inspection finds:
- softness or loss of structural integrity;
- sagging;
- rot;
- plywood delamination;
- persistent OSB edge swelling;
- substantial warping;
- visible mold or suspected concealed growth;
- contaminated water;
- widespread retained moisture;
- loose or degraded connections; or
- damage extending into joists, beams, posts, or other supports.
Plywood and OSB do not always fail in the same way. Plywood can separate between veneers after damaging exposure. OSB may dry more slowly and retain enlarged edges. Neither condition should be dismissed as cosmetic without determining whether the panel remains serviceable and compatible with the finished flooring.
LP Building Solutions likewise distinguishes a wet but strong panel that may be ventilated and dried from a rotten or spongy panel that should be removed. It also cautions that ordinary subfloor panels are not intended for long-term water resistance in its water-damaged subfloor repair guidance.
There is no evidence-supported universal moisture threshold or drying period for every wooden subfloor. Readiness depends on the panel, framing, finish-floor system, environmental conditions, and applicable manufacturer requirements. A calendar or dry-looking surface alone cannot verify that the assembly is ready to cover.
Four possible endpoints
1. Monitor after verified drying
This may be appropriate when exposure was limited, direct measurements confirm drying, the panel remains firm and dimensionally acceptable, and no structural or contamination concern remains. Continue monitoring the repaired moisture source.
2. Obtain professional structural drying
This may be appropriate where moisture extends into cavities or multiple materials, drying conditions are difficult to establish, or concealed moisture cannot be confidently mapped and verified.
3. Replace localized damaged panels
This may be appropriate where damage is confined to removable panel sections and the surrounding panel, framing, and connections are sound. The patch still requires rated material, supported boundaries, correct installation, and a flat transition.
4. Pause for framing and structural evaluation
This is appropriate where joists or supports are rotten, cut, displaced, or significantly sagging; where the extent of damage is uncertain; or where opening the floor may change how loads are carried.
Exposure classifications and moisture-resistant branding are not permission to leave a panel chronically wet. Control the water first, then decide what can remain based on measured condition rather than appearance or label.
Repair boundaries, safety, and choosing the right professional
A homeowner can often perform useful preliminary work: document symptoms, identify an obvious appliance leak, inspect accessible areas from a safe location, and gather panel and flooring information. That is different from carrying out structural repair.
Major floor openings, unstable framing, extensive decay, contaminated water, or uncertain support conditions require escalation. Cutting a panel can expose wiring, plumbing, ducts, nails, and unsupported finish materials.
Match the professional to the problem
- Plumber: leaking supply, drain, toilet, tub, shower, dishwasher, refrigerator, or other plumbing or appliance connection.
- Roofer or exterior-envelope specialist: roof entry or building-envelope leakage.
- Restoration specialist: substantial concealed moisture, structural drying, or contaminated water.
- Flooring installer: compatibility among the subfloor, underlayment, adhesive or fastening method, and finished flooring.
- Pest or wood-destroying insect specialist: suspected insect damage.
- Mold professional: assessment or remediation concerns beyond ordinary panel replacement.
- Structural engineer or other qualified design professional: damaged joists, questionable beams or supports, significant or growing sag, altered framing, or uncertainty about load capacity.
When deterioration extends from the panel into joists or other framing, panel replacement should pause until the framing is assessed. The repair may require reinforcement, replacement, or redesigned support—not simply a larger sheet of plywood.
Do not install new flooring until the moisture source has been corrected and the subfloor and framing have been verified as ready. Covering the area makes continued inspection harder and may trap moisture or conceal movement.
Old black adhesive requires special caution
Do not scrape, sand, grind, or otherwise mechanically disturb old black flooring adhesive merely because its composition is unknown. Commercial flooring guidance recommends treating such adhesive as potentially asbestos-containing until properly tested. Its statement that confirmed asbestos requires licensed abatement should not be treated as a universal legal rule; testing, disturbance, removal, transport, and disposal requirements depend on the jurisdiction and project. Consult the relevant local authority or qualified asbestos professional before proceeding. The underlying caution is discussed in this canonical guide to common subfloor problems and residues.
Confirm them with the local authority rather than assuming a repair is exempt.
Questions to ask a contractor
- What caused the failure?
- Has the source been corrected, and by whom?
- How was moisture measured and mapped?
- Does deterioration extend into joists or other framing?
- What rated replacement panel is proposed?
- What are its span rating, measured thickness, and edge profile?
- How will every patch boundary be supported?
- Which panel instructions govern gaps, orientation, fastening, and adhesive?
- Which finished-floor instructions govern flatness, moisture, and underlayment?
- How will the transition between existing and replacement material be made flat?
- How will dryness and structural soundness be verified before covering?
- Are permits, inspections, environmental testing, or specialist assessments required?
The final decision sequence is:
- Identify the floor layers.
- Diagnose the cause rather than treating the visible symptom.
- Select a rated assembly for the actual supports, exposure, and finished flooring.
- Follow product-specific installation requirements.
- Verify moisture condition, support, and structural soundness before covering the work.
Do not treat every squeak with extra fasteners, every uneven area with underlayment, or every water stain with a panel patch. Plywood versus OSB is only one choice within the complete floor system. Softness, substantial sagging, rot, contaminated water, mold, or damaged joists shifts the job away from surface preparation and toward qualified professional evaluation.
Frequently asked questions about wooden subfloors
Is plywood or OSB better for a wooden subfloor?
Neither is universally better. Properly rated plywood and OSB can both serve as structural subfloor panels.
OSB is commonly less expensive, heavier, and relatively uniform. Plywood is commonly lighter and faster-drying. Plywood can delaminate after damaging exposure, while OSB can retain swollen edges and may dry more slowly. Product grade, span rating, edge profile, support spacing, expected exposure, installation method, and finished-floor requirements are more useful selection criteria than material name alone.
How thick should a wooden subfloor be?
There is no universal correct thickness. Required panel selection depends on support spacing, span rating, anticipated loads, orientation, edge support, finished flooring, applicable code, and manufacturer instructions.
Read the complete panel stamp and remember that nominal thickness can differ from actual measured thickness. For a repair, measure the existing sound panel and match its functional thickness, edge profile, and structural rating while maintaining a supported, flat transition.
Does a wooden subfloor always need underlayment?
No. An appropriate combination panel can serve as both subfloor and underlayment in certain assemblies. Carpet and pad over suitable Sturd-I-Floor is a common example, and underlayment may be optional beneath hardwood in some rated systems.
Other finishes impose different demands. Sheet vinyl and vinyl tile generally require smooth plywood underlayment over ordinary structural sheathing, and tile may require an additional system layer. The instructions for the selected finish-floor system control.
Can a wet wooden subfloor dry without being replaced?
Sometimes. Limited clean-water exposure may be dried when the source is corrected and the panel remains firm, structurally sound, and free from consequential swelling, warping, delamination, rot, mold, or connection damage.
Do not rely on surface appearance. Expose the assembly as needed, measure retained moisture directly, inspect the framing, and verify compliance with the applicable panel and flooring requirements. Contamination, softness, sagging, persistent swelling, delamination, or framing damage makes replacement or professional assessment more likely.
Do squeaks mean the subfloor is rotten?
No. Squeaks can result from loose fasteners, gaps between a panel and joist, unsupported edges, wood movement, shifting framing, or movement in the finished flooring. Rot is one possible cause, but sound alone cannot confirm it.
Map the squeak, look for moisture and softness, and inspect from below when access is reasonably safe. If the area is soft, sagging, wet, or associated with damaged framing, stop treating it as a simple noise problem and investigate the complete structure.