
Choose a Subfloor That Can Get Damp—and Still Dry
Plywood generally dries faster; standard OSB usually costs less, while enhanced OSB varies by product. Choice depends on temporary exposure versus chronic dampness.
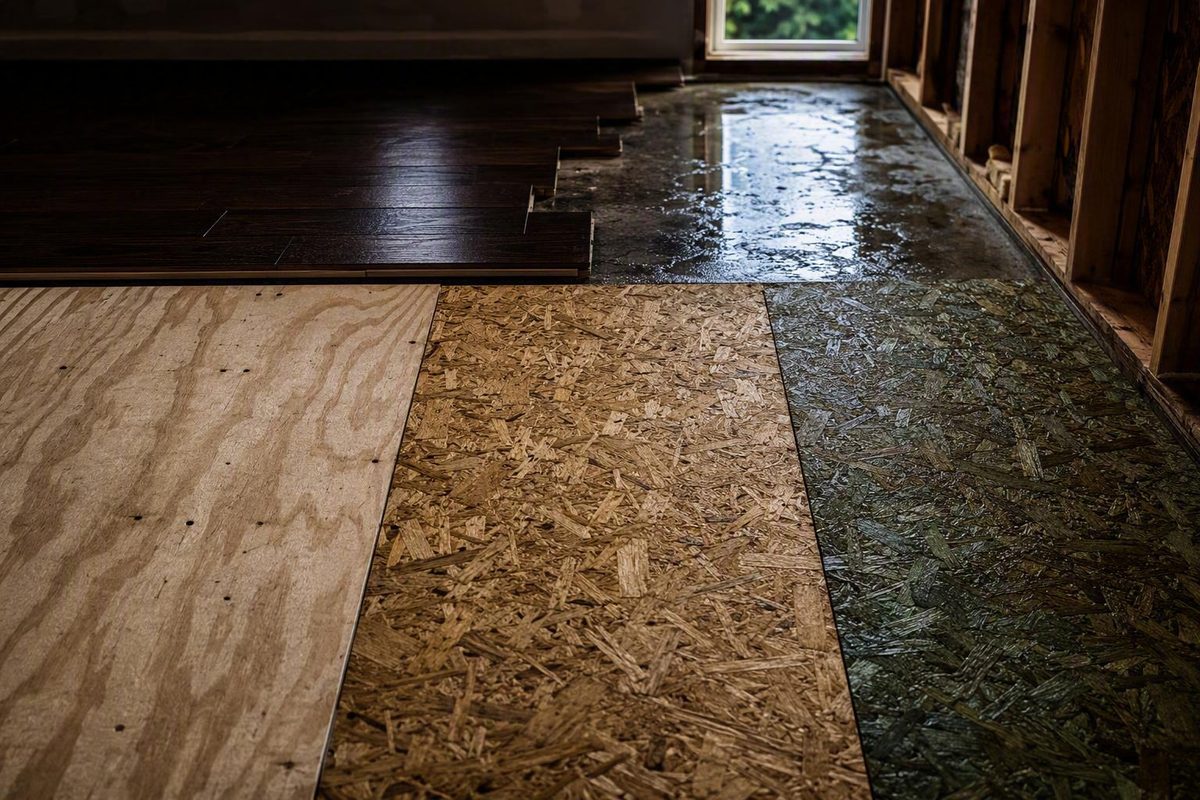
A moisture-resistant subfloor is not permission to ignore water. It is a structural layer selected to tolerate a defined type or duration of exposure while the rest of the floor assembly manages bulk water, vapor, condensation, drainage, and drying.
That distinction matters because “moisture” may mean rain during framing, vapor moving through concrete, humid air condensing beneath an air-conditioned floor, an appliance leak, or flooding. A panel suited to temporary construction exposure may not be suitable for chronic dampness or direct water exposure.
Start by identifying the substrate and moisture source. Then determine where the assembly can dry and select the structural panel or slab-overlay system. Add underlayment, vapor control, drainage, or wet-room waterproofing only where the complete flooring system requires it.
What “Moisture Resistant” Actually Means
The structural subfloor is the load-supporting layer beneath the finished flooring. In a framed floor, it is commonly plywood or oriented strand board attached to joists. A concrete slab may itself be the structural substrate.
Underlayment, vapor-control materials, drainage layers, separation layers, and waterproofing membranes can sit above or below that substrate. They do not necessarily provide structural support, and they do not perform interchangeable jobs.
A moisture-resistant subfloor may absorb less water, swell less at the edges, dry more readily, or better tolerate temporary construction exposure than another material. It is not necessarily waterproof.
In practical terms, “moisture resistant” does not establish that a panel can safely withstand:
- An active plumbing or appliance leak
- Flooding or standing water
- Permanent contact with wet soil or concrete
- Chronic crawl-space condensation
- Unlimited rain exposure during construction
- Water trapped beneath low-permeance flooring
- Repeated wetting without inspection and drying
Exposure 1 is temporary-exposure language
An Exposure 1 classification describes a panel intended to tolerate moisture associated with construction delays or similarly severe temporary conditions. It is not a permanent exterior rating and does not mean the panel can remain indefinitely exposed to rain, standing water, or chronic dampness.
Panels should still be protected promptly, and previously wet material should not be covered until it has dried and remains suitable for the intended finish floor. Any requirements concerning edges, seams, storage, installation, or weather exposure must come from the selected panel’s current instructions.
Resistance, vapor control, drainage, and waterproofing are separate mechanisms
A useful specification identifies what the product or layer actually does:
- Water resistance limits absorption, swelling, or water-related deterioration.
- Vapor control slows water vapor moving through an assembly.
- Drainage gives liquid water a route toward removal.
- Drying potential allows moisture already in the assembly to escape.
- Wet-room waterproofing creates a continuous system intended to contain water in a designated wet area.
- Underlayment prepares or separates the finish flooring and may provide smoothing, cushioning, sound control, uncoupling, or limited moisture protection.
A water-resistant panel does not automatically block vapor from a slab. A vapor retarder does not drain a leak. A drainage layer does not make the finished floor floodproof. An underlayment labeled moisture resistant does not automatically replace a shower or wet-room waterproofing system.
Treat warranty language as limited product information
A no-sand warranty is not evidence that a panel is waterproof. It means only that the manufacturer offers the stated warranty, subject to the current governing terms.
DryMax provides a useful specification example rather than a universal recommendation. Georgia-Pacific lists it as tongue-and-groove OSB with a clear edge seal and an Exposure 1 classification. The manufacturer also references PS 2-18 and APA, lists 4-by-8-foot panels in 19/32 CAT and 23/32 CAT options, and advertises a 500-day no-sand warranty on its DryMax product page.
Those are manufacturer-listed details. Before relying on the warranty, obtain its current complete terms and the corresponding installation instructions. Do not infer what conditions, expenses, or remedies are covered from the “500-day” headline alone.
Diagnose the Moisture Source Before Choosing a Material
Before comparing plywood and OSB, determine what is making—or could make—the floor wet. Different moisture sources require different controls.
| Moisture source | Typical path | Primary response |
|---|---|---|
| Construction rain | Falls onto exposed panels before the building is dried in | Use an appropriately rated panel, protect it promptly, remove collected water, and verify dryness before covering |
| Plumbing or appliance leak | Liquid enters from above or within a wall or floor cavity | Repair the pipe, fixture, drain, or appliance and inspect affected layers |
| Ground vapor | Moisture moves from soil into a crawl space or through a slab | Correct exterior water problems and use an assembly-appropriate ground or slab vapor strategy |
| Concrete moisture | Construction water or ground moisture moves through the slab | Test by the flooring or adhesive manufacturer’s approved method and use a compatible control system |
| Humid-air condensation | Warm, moisture-laden air contacts a cooler subfloor or framing surface | Control humid-air entry, air leakage, temperature, insulation, and drying potential |
| Trapped construction moisture | Damp panels, concrete, framing, or patching compounds are enclosed too soon | Delay closure and verify acceptable moisture before adding low-permeance layers |
| Flooding | Water inundates multiple parts of the floor assembly | Treat the event as an assembly-wide problem requiring appropriate professional assessment |
| Repeated spills | Water enters seams or penetrations in kitchens, entries, or laundry rooms | Improve surface protection and cleanup while checking for concealed leakage |
It cannot correct poor grading, a leaking supply line, a wet slab, missing drainage, or recurring condensation.
Crawl spaces require an assembly diagnosis
For a floor over a crawl space, inspect more than the visible subfloor. Relevant conditions include:
- Roof runoff, gutters, downspouts, and grading
- Standing water or persistently damp soil
- Ground-vapor control
- Foundation drainage
- The crawl space’s ventilation or conditioning strategy
- Air leakage through the floor assembly
- Duct leakage and cold surfaces
- Insulation location and vapor permeance
- Finish flooring that may restrict upward drying
Hot, humid outdoor air can enter a cooler crawl space and condense on the underside of an air-conditioned floor. Adding more outdoor ventilation is therefore not automatically the correct response in every climate. Bulk water, airflow, vapor movement, insulation, temperature, and finish-floor permeance must be considered together, as explained in this manufacturer discussion of crawl-space condensation and moisture sandwiches.
Begin with bulk water. Redirect runoff, address drainage defects, and repair leaks before deciding whether the crawl space needs ground-vapor control, air sealing, insulation changes, ventilation, conditioning, or a combination. Those decisions depend on the climate and the complete building assembly.
Concrete is not automatically dry because it looks dry
Concrete contains construction moisture and may also transmit moisture from the ground.
The selected flooring, adhesive, or vapor-control manufacturer should identify:
- The approved moisture-test method
- Required slab preparation
- Test locations and quantity
- The acceptable result
- Compatible primers, adhesives, and vapor-control products
Do not replace a required test with an improvised taped-plastic check. A simple check may reveal obvious moisture, but it does not demonstrate compliance with a flooring system’s installation requirements.
Investigate damage before shopping
If the floor is soft, sagging, unsupported, or visibly decayed, panel selection is no longer the first question. Determine whether the damage is limited to a replaceable panel or extends into joists, beams, sill plates, posts, footings, or foundations.
Soft structural wood indicates that the moisture source must be corrected before repair. Sagging associated with foundation cracking, movement, or rot crossing multiple framing members warrants professional structural assessment before new flooring conceals the condition.
Plywood, Standard OSB, and Enhanced OSB Compared
Plywood and OSB are both engineered wood panels, but their construction influences their response to wetting.
Plywood is made from thin wood veneers laminated with alternating grain directions. OSB is made from oriented wood strands bonded with resin and wax under heat and pressure. Neither construction method makes a panel waterproof.
The available guidance supports a qualified pattern: plywood generally dries faster and tends to recover more evenly after short-term wetting, while conventional OSB may retain moisture longer and develop persistent swelling at edges and seams. A home-inspection comparison of plywood and OSB subfloor behavior also emphasizes that panel support, dryness, gaps, thickness, and installation quality matter.
Sources differ over which material initially absorbs water faster. That disagreement does not eliminate the practical concern: a material may absorb moisture relatively slowly yet also release it slowly. For flooring work, the important questions are how long the panel remains wet, whether its edges stay raised, whether its support and fasteners remain sound, and whether the surface still satisfies the finish-floor requirements.
Prolonged wetting can damage either material. Plywood may swell, warp, weaken, or separate between plies. Grade, exposure classification, edge treatment, duration of exposure, and drying conditions all affect the outcome.
Where enhanced OSB fits
Enhanced OSB is intended to improve on the moisture behavior of conventional OSB.
It is not one uniform category. A premium OSB product may behave differently from commodity OSB, but the available evidence does not independently demonstrate that enhanced OSB always outperforms exterior-grade plywood. Compare exact panel specifications, installation documents, and warranties instead of assuming that every “high-performance” panel has the same properties.
DryMax is one attributed example. Georgia-Pacific describes it as a tongue-and-groove OSB subfloor with a clear edge seal. Those features identify its construction and intended positioning; they do not establish that it is the best panel for every climate, wet area, or finished flooring system.
Standard OSB is generally presented as the lower-cost option, while enhanced panels usually carry a premium and plywood may cost more than conventional OSB. Actual pricing varies by grade, thickness, market, and availability; a manufacturer comparison describes the same broad cost direction while also noting plywood’s faster drying tendency.
Comparison matrix
| Factor | Plywood | Standard OSB | Enhanced OSB |
|---|---|---|---|
| Typical role | Structural subfloor where conventional detailing, stiffness, or faster drying is valued | Economical structural subfloor in dry or protected conditions | Structural subfloor where temporary exposure or edge-swelling risk may justify a premium |
| Short-term wetting behavior | Can absorb water and swell but often changes more evenly | May tolerate limited exposure but can swell noticeably at cut edges and seams | Designed to reduce absorption or swelling relative to conventional OSB |
| Drying tendency | Generally faster | Generally slower | Product-specific; verify manufacturer information |
| Edge-swelling concern | Possible, though often less persistent after incidental wetting | Recognized concern where edges remain wet | Often addressed through resin, density, wax, or edge-treatment changes |
| Construction-exposure use | Appropriate only where the exact panel rating permits it | Limited by its exposure classification and instructions | Often marketed for temporary construction exposure; exact classification and warranty govern |
| Relative cost direction | Commonly above standard OSB | Commonly the lowest initial-cost panel option | Commonly above standard OSB and sometimes competitive with plywood |
| Evidence limits | Performance varies by grade, species, adhesive, thickness, and manufacturer | General comparisons do not represent every rated OSB product | Independent product-to-product comparisons with plywood are limited |
| Best-fit scenario | Framed floor where incidental wetting and drying speed are meaningful concerns | Dry, protected floor where budget matters and installation is controlled | Project where temporary rain, delays, or seam-sanding risk makes added moisture features valuable |
There is no universal winner. Fit depends on the expected exposure, available drying path, structural rating, support layout, finished flooring, price, and installation quality.
Subfloor, Underlayment, Vapor Control, Drainage, and Waterproofing Are Different Layers
A floor may include several layers, each with a distinct assignment:
- Structural subfloor or slab: Supports loads and provides the structural base.
- Vapor barrier or retarder: Restricts vapor movement through the assembly.
- Drainage or separation layer: Creates space for liquid water, airflow, or physical separation.
- Underlayment: Smooths or prepares the substrate and may add cushioning, sound reduction, uncoupling, or limited moisture protection.
- Waterproofing membrane: Forms a continuous water-management layer in a designated wet area.
- Finish flooring: Provides the walked-on surface and affects the floor’s drying potential.
Underlayment is normally installed between the substrate and finish flooring. One product may primarily smooth the surface, another may reduce sound, and another may include a vapor-control component. A retail underlayment guide distinguishes underlayment from a vapor barrier and notes that some installations may require both, subject to the flooring manufacturer’s instructions.
The word “moisture” on an underlayment package does not, by itself, establish that the product:
- Provides the vapor control required over a slab
- Is approved for direct contact with damp concrete
- Can drain a leak
- Waterproofs a bathroom
- Is compatible with a particular adhesive
- Can be enclosed safely between other low-permeance layers
Avoid creating a moisture sandwich
A floor needs a viable drying path. If a low-permeance layer is installed above the subfloor and another is installed below it, moisture from wet framing, a slab, humid air, or a leak may become trapped between them.
Vinyl plank and vinyl tile can substantially restrict upward drying. That is not inherently a defect; low permeance can be useful in a properly designed system. Risk increases when moisture enters below the vinyl and cannot dry downward.
Before adding plastic, foil-faced insulation, foam, fluid-applied vapor control, or another low-permeance material, map the complete assembly:
- Where can moisture enter?
- Which layers slow vapor?
- Can the subfloor dry upward, downward, or both?
- What happens if a leak reaches the cavity?
- Does the finish-floor manufacturer permit the proposed barrier and underlayment?
- Will the adhesive cure and bond over the selected layers?
There is no universal vapor-barrier location for every floor. Climate, indoor temperature, crawl-space design, slab conditions, insulation, air sealing, finish flooring, and applicable construction requirements all affect placement.
Choose the Assembly by Location and Moisture Path
Room names provide context, but the substrate and moisture path are more important. A bathroom above conditioned space differs from one above a humid crawl space. A slab with effective ground-moisture control differs from an older slab that regularly transmits moisture.
Decision matrix
| Substrate and location | Likely moisture source | Probable drying direction | Finish-floor concern | Appropriate control mechanism |
|---|---|---|---|---|
| Framed floor exposed during construction | Rain and trapped construction moisture | Both directions before enclosure; assembly-dependent afterward | Finish flooring should not cover wet panels | Correctly rated plywood or enhanced OSB, prompt protection, water removal, and moisture verification |
| Framed floor over hot-humid crawl space | Ground vapor, humid-air entry, condensation, leaks | Often restricted by finish flooring above or insulation below | Low-permeance flooring can limit upward drying | Bulk-water control, ground-vapor strategy, air control, suitable insulation, and a defined drying path |
| Basement concrete slab | Construction and ground moisture | Usually upward unless interrupted by a compatible control layer | Adhesive and flooring moisture limits may be strict | Manufacturer-approved slab testing, compatible vapor control, and possibly a raised separation system |
| Kitchen over framing | Spills and sink or dishwasher leaks | Assembly-dependent | Water can enter seams and cabinet penetrations | Structurally suitable panel, leak access, and finish-compatible underlayment where required |
| Laundry room over framing | Washer, supply, drain, or overflow | Assembly-dependent | A concealed leak may remain beneath resilient flooring | Leak prevention and an approved underlayment or waterproofing strategy where required |
| Bathroom outside the shower | Spills, fixture leaks, and wet cleaning | Often restricted by finish and ceiling layers | Tile and resilient flooring have substrate-specific requirements | Suitable structural subfloor plus system-approved underlayment or waterproofing |
| Shower or designated wet area | Repeated direct water exposure | Controlled by the waterproofing design | The structural subfloor is not automatically the waterproof layer | Complete approved shower or wet-room system |
| Flood-prone area | Bulk inundation | Unpredictable and often obstructed | Multiple concealed layers may be affected | Flood-resilient planning and professional assessment, not merely a moisture-resistant panel |
Framed floors exposed during construction
Compare correctly rated plywood with enhanced OSB based on expected weather, project duration, availability, price, and the consequences of raised seams delaying finished-floor installation.
Both options still require timely protection. Read the exact exposure language, storage requirements, installation instructions, and warranty terms rather than relying on a dealer’s summary.
Enhanced OSB may be worthwhile when intermittent rain or scheduling delays are realistic and seam sanding would disrupt the project. Plywood remains a reasonable conventional option when faster drying after incidental exposure is a priority.
Basement slabs and raised modular systems
Test a basement slab according to the selected flooring or adhesive manufacturer’s instructions. Where vapor control is required, it must be compatible with the slab preparation, underlayment, adhesive, and finished floor.
A raised modular tile can separate flooring from the slab and may create channels for airflow or drainage. It is not structural sheathing fastened to joists and should not be evaluated as though it were plywood or OSB.
For example, DryBarrier’s manufacturer describes interlocking thermoplastic-elastomer tiles measuring 24 by 24 inches overall and 3/8 inch thick. The raised underside creates a 1/4-inch air gap. The manufacturer lists laminate, carpet, vinyl, and floating engineered hardwood as compatible coverings, subject to the applicable flooring instructions, on the DryBarrier product page.
Those specifications explain the proposed mechanism: separation and raised channel space. They do not establish that every finished floor above the system will withstand a leak or flood, or that every adhesive and flooring product is compatible.
Hot-humid crawl spaces
Do not begin with the panel brand. Begin with water, air, and temperature:
- Redirect roof and surface runoff.
- Address standing water and drainage.
- Determine how ground moisture is controlled.
- Identify humid-air entry and duct leakage.
- Check for condensation on cooler floor surfaces.
- Review insulation and air-sealing details.
- Determine whether the finish floor permits upward drying.
- Select the panel after the assembly has a plausible drying strategy.
Replacing damp OSB with plywood may improve drying after incidental wetting, but it will not stop condensation. Premium OSB can also remain wet if humid air continuously condenses against it.
Kitchens and laundry rooms
Distinguish intermittent surface exposure from an unresolved plumbing or appliance defect.
A moisture-resistant panel may provide useful tolerance while a spill is discovered and cleaned. It does not make a leaking dishwasher connection, recurring drain overflow, or failed washer supply acceptable. Consider how a leak would be detected, accessed, contained, and dried.
Bathrooms, tile, stone, and showers
A structurally suitable subfloor may still need a compatible underlayment, uncoupling layer, backer, or waterproofing membrane. Tile, stone, and shower systems can also impose their own support, stiffness, seam, fastening, and substrate requirements.
Do not prescribe plywood or OSB beneath tile, stone, or a shower from a general panel comparison. Confirm that the complete flooring or waterproofing system permits the selected substrate, panel thickness, support spacing, underlayment, membrane, fasteners, and seam treatment.
A Specification and Installation Checklist
A moisture-resistant label should begin the review, not end it. Collect the documents governing the proposed assembly and follow the most restrictive applicable requirement.
Useful documents include:
- The panel grade stamp and current installation manual
- The complete panel warranty
- Applicable structural and local construction requirements
- The finish-floor installation manual
- The adhesive technical data sheet
- The vapor-control or slab-treatment instructions
- The waterproofing-system installation manual
- Approved details for seams, penetrations, transitions, and perimeters
Structural panel
Verify:
- Whether the panel is expressly intended for structural subfloor use
- Its grade, span rating, and exposure classification
- Required thickness for the actual support layout and design
- Whether tongue-and-groove edges or separate blocking are required
- The standard listed by the manufacturer
- Whether the finished floor imposes stricter substrate requirements
- How cuts, penetrations, and field modifications must be handled
Do not select thickness from a room-based chart alone. Joist spacing, loads, panel orientation, edge support, and finish-floor stiffness requirements all matter.
Layout and fastening
Consult the selected panel’s instructions for:
- Panel orientation
- Tongue-and-groove direction
- End-joint placement
- Edge and end gaps
- Supported and unsupported edges
- Fastener type and length
- Edge and field fastening schedules
- Adhesive type and application
- Seam treatment
- Permitted tapes, coatings, or sealers
- Treatment of damaged or incorrectly driven fasteners
These are product- and assembly-specific requirements. A premium panel installed with inadequate support or unsuitable fasteners does not create a premium floor.
Moisture condition before covering
For concrete, use the test method and acceptance limit specified by the selected flooring, adhesive, or moisture-control system. Record the results and test locations. Do not rely only on elapsed curing time, surface color, or a casual plastic-sheet check.
For plywood or OSB, use an appropriate moisture meter and follow the finish-floor manufacturer’s acceptance criteria.
Measure representative areas, including locations near plumbing, exterior walls, recent patching, and known wetting. Compare questionable areas with dry reference areas rather than relying on one convenient reading.
Layer compatibility
Confirm approval of the complete combination:
- Structural substrate
- Patch or leveling compound
- Primer
- Vapor-control layer
- Underlayment
- Waterproofing or uncoupling layer
- Adhesive
- Fasteners
- Finish flooring
- Perimeter and penetration details
Warranty review
Read the current complete warranty rather than relying on the headline duration. Determine:
- What conditions are covered
- What exposure limits apply
- Which storage and installation practices are required
- What notification and documentation procedures apply
- What remedy is offered
- Whether labor or finished-floor damage is addressed
- Whether coverage transfers to another owner
Do not assume an answer where the warranty is silent or unavailable.
Separate checkable specifications from promotional language. Dimensions, panel category, Exposure 1 classification, and a listed standard can be verified. Claims about warmth, mold resistance, retained strength, durability, or service life require disclosed test methods and conditions before they support a direct comparison.
What to Do After the Subfloor Gets Wet
A wet subfloor is not automatically ruined, but it should not be covered simply because its surface looks dry.
Use this sequence:
- Stop the source. Repair the leak, redirect water, address drainage, or change the condensation-producing conditions.
- Assess the scope. If the area may be unstable, extensively contaminated, or beyond safe access, stop and seek qualified assistance.
- Expose affected layers where appropriate. Water-trapping finishes, insulation, or underlayment may prevent inspection and drying.
- Promote drying. Use methods appropriate to the materials and complete assembly.
- Measure moisture. Follow the applicable substrate and finish-floor requirements.
- Inspect physical condition. Moisture readings do not reveal every form of deformation, deterioration, or support failure.
- Delay closure. Do not install the finish floor until the substrate is dry, sound, and acceptable to the complete flooring system.
What to inspect
Check for:
- Persistent raised seams
- Swelling through the panel thickness
- Soft or crumbly areas
- Plywood ply separation
- Decay or deterioration associated with prolonged dampness
- Visible or suspected concealed mold
- Loose, corroded, or ineffective fasteners
- Damaged tongue-and-groove edges
- Missing or failed edge support
- Sagging between joists
- Repeated wetting at the same location
- Wet insulation or framing below
- Moisture trapped beneath low-permeance flooring
Dryness alone also does not prove that the panel remains structurally sound.
Sanding is a conditional remedy
A raised seam may be a surface-flatness problem, or it may indicate deeper deterioration. Sanding should be considered only when:
- The panel manufacturer permits it
- The water source has been corrected
- The panel has dried to the applicable acceptance condition
- Swelling has stabilized
- The panel remains firm and adequately supported
- Fasteners and edges remain sound
- The resulting surface satisfies the finish-floor requirements
Do not sand a wet panel and immediately cover it.
Replacement or professional evaluation is the safer course when panels are soft, delaminated, decayed, repeatedly wetted, extensively mold-affected, unsupported, or structurally uncertain. Widespread crawl-space rot, foundation movement, or damage spanning multiple joists should be evaluated before new flooring hides the evidence.
A Practical Buying Decision: Pay for the Mechanism, Not the Label
A premium moisture-resistant subfloor is worthwhile when its specific mechanism addresses a realistic project risk. Ask: What does the extra cost actually buy?
Possible mechanisms include:
- Faster drying after incidental exposure
- Reduced edge swelling
- Factory-sealed edges
- Better tolerance of temporary construction rain
- A defined warranty remedy
- Vapor control over concrete
- Physical separation from a slab
- An airflow or drainage gap
- Continuous wet-room waterproofing
These mechanisms solve different problems and should not be ranked on one universal scale.
Buy by use case
Choose properly rated plywood when faster drying after incidental wetting matters, when the finish-floor system favors plywood, or when a conventional panel is preferred. Plywood still needs protection from prolonged dampness and leaks.
Choose standard OSB where the floor will remain dry and protected, the panel is correctly rated, installation is controlled, and lower initial material cost is important. It is not automatically the prudent choice for an assembly with recurring moisture.
Consider enhanced OSB where temporary rain, construction delays, and seam-sanding risk could disrupt the schedule. Compare the actual exposure classification, edge treatment, installation instructions, warranty terms, and local price premium.
Consider a modular slab-overlay system where a concrete-floor project needs separation, airflow, or drainage channels and the proposed finish flooring is approved. This system performs a different job from structural sheathing attached to joists.
Use a complete waterproofing system in showers and other designated wet areas. A moisture-resistant structural panel may be part of the assembly, but it is not automatically the waterproofing layer.
Avoid paying extra for claims that cannot be checked. Terms such as “mold resistant,” “stronger when wet,” “warmer,” or “long-lasting” are incomplete without a test standard, conditions, comparison product, limitations, and system context.
A reliable selection flow is straightforward:
- Identify the substrate.
- Identify the moisture source.
- Correct bulk-water and condensation problems.
- Determine the available drying direction.
- Choose the structurally appropriate panel or slab-overlay system.
- Add required vapor, drainage, or waterproofing controls.
- Verify compatibility with the finish flooring and installation method.
- Document product instructions, test results, and warranty conditions.
- Do not cover a previously wet subfloor until measurement and inspection show that it is dry and sound.
Choose the assembly by the moisture source and drying path—not by a product label alone.
Frequently Asked Questions
Is an Exposure 1 subfloor waterproof?
No. Exposure 1 identifies a panel intended for temporary construction-related moisture exposure, not permanent outdoor use, flooding, standing water, active leaks, or chronic dampness. Georgia-Pacific uses the classification in this temporary-exposure sense in its DryMax specifications.
Protect the panel promptly and inspect it after significant wetting. A no-sand warranty does not convert an Exposure 1 panel into a waterproof floor assembly.
Is plywood or OSB better for a moisture-prone subfloor?
Neither is universally better. Plywood generally dries faster and tends to recover more evenly after short-term wetting. Conventional OSB commonly costs less but may retain moisture longer and develop raised edges. Enhanced OSB is intended to reduce some of those problems, although performance varies by product.
Plywood is a cautious conventional choice when drying speed matters. Standard OSB remains practical for dry, protected floors. Enhanced OSB may justify its premium where temporary construction exposure is likely. In every case, rating, support, thickness, fastening, drying potential, and finish-floor requirements govern the choice.
Do I need both underlayment and a vapor barrier?
Possibly. They perform different functions. Underlayment may smooth the substrate, provide cushioning, reduce sound, or offer limited moisture protection. A vapor barrier or retarder controls vapor movement.
Some assemblies require both. Others use an underlayment with an integrated vapor-control component, while some should not receive another low-permeance layer. Follow the complete flooring manufacturer’s instructions and confirm that the proposed layers will not trap moisture.
What type of subfloor system can go over basement concrete?
The answer depends on slab moisture and the finished floor. Test the concrete using the flooring or adhesive manufacturer’s approved method. Then install the specified compatible vapor-control layer, underlayment, adhesive, or raised system.
A modular product such as DryBarrier is one possible raised-overlay approach. Its manufacturer describes 3/8-inch-thick tiles that create a 1/4-inch air gap and lists laminate, carpet, vinyl, and floating engineered hardwood as compatible coverings on the product page. It is not equivalent to structural wood sheathing attached to joists, and final compatibility remains subject to the complete flooring instructions.
Can swollen OSB seams be sanded and covered?
Sometimes, but only after the moisture source has been corrected, the panel has dried, and inspection confirms that it remains structurally sound. The panel manufacturer must permit sanding, and the resulting surface must still satisfy the flooring system’s flatness, thickness, support, and moisture requirements.
Do not assume every raised seam is cosmetic. Replace the material or obtain professional evaluation when swelling is accompanied by softness, failed edges, loss of support, decay, extensive mold, repeated wetting, or uncertain structural condition.